When you encrypt using a modern block cipher (e.g. AES) the last plaintext block is often not exactly of block size bytes. To still allow the block cipher to encrypt it, we have to apply “padding”.
Padding adds data to the end of a message prior to the encryption. There is bit padding (which adds bits) and byte padding (which works on complete bytes). Here, we focus on byte padding.
Some examples for (byte) padding (modes) also implemented in CrypTool 2 are: – “None” –> no padding at all – 0-Padding –> adds zeros to the end of the block – 1-0-Padding –> adds a one and then zeros to the end of the block – ANSI X9.23 Padding –> adds zeros and the last byte is the number of padded bytes – ISO 10126 Padding –> adds random bytes and last byte is the number of padded bytes – PKCS#7 Padding –> adds the value n of padded bytes n-times to the end of block
In the video below of my “Cryptography for everybody” YouTube channel, I discuss what padding is, show all mentioned different padding modes, and also analyze these using CrypTool 2.
In the last view days, I implemented the Mexican Army Cipher Disk and its cryptanalysis in CrypTool 2. I also made a YouTube video about that (see below in this blog post).
The Constitutionalists in Mexico used the Mexican Army Cipher Disk at the beginning of the 20th century during the Mexican revolution. It is a homophonic substitution cipher, but rather weak. For encrypting a letter, you have either a 3-symbol or a 4-symbol homophone group, with a total of 100 homophones (01 to 00).
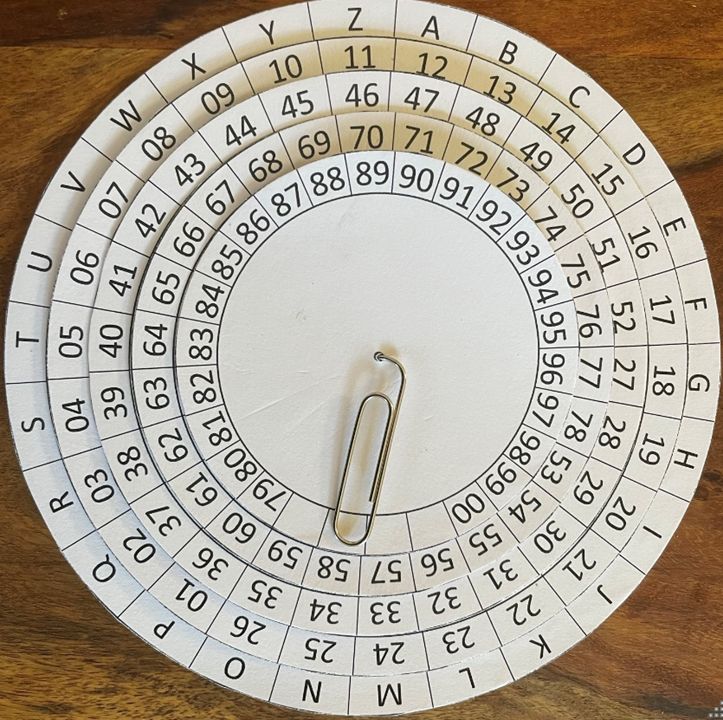
My self-created Mexican Army Cipher Disk
The groups are created using the disk device, which consists of 5 disks (see shown figure above): • The outer disk contains the Latin alphabet • Four inner disks contain 2 digits numbers • Four inner disks can be turned
The key of the cipher is the rotation of the four inner disks and can be described in two ways: 1) The digit groups below the letter A : 01, 27, 53, 79 2) With four Latin letters ; each letter is the one above the first digit group of the corresponding disk: A, A, A, A
Build your own Mexican Army Cipher Disk
Now, if you want to also build your own cipher disk, you may use my self-created template here:
Since I used powerpoint to create the template, the angles are not 100% perfect, but it still works well. You need to print it five times and always cut a smaller disk out of each printout. To get more stability, you may also use some cardboard and glue the disks onto these before assembling the device. Finally, all the disks are placed on top of each other. I used a paper clip that I bent and put through all the slices.
Cryptanalysis
If we want to break the Mexican Army Cipher Disk, it is a rather easy task. By hand, we just search in each number group (01 to 26, 27 to 52, 53 to 78, and 79 to 00) for the most frequent homophone. This stands probably for the letter E. Move your disks to all found E positions and you should be able to decrypt your ciphertext.
If you don’t want to break it by hand, you can use CrypTool 2 and the “Mexican Army Cipher Disk Analyzer” component for automatic cryptanalysis. It performs a brute-force attack and searches through all disk settings. Here, with the help of a language model (e.g. English pentagrams) it scores each of the decrypted texts. The correct plaintext should be on the first position of the best list of the analyzer.
YouTube Video
I alse created a YouTube video about the Mexican Army Cipher Disk. You may watch it here:
My YouTube video about the Mexican Army Cipher Disk
Some References
Angel Angel, José de Jesús, and Guillermo Morales-Luna. “Cryptographic Methods During the Mexican Revolution.” Cryptologia 33.2 (2009): 188-196
Kahn, David. The Codebreakers: The comprehensive history of secret communication from ancient times to the internet. Simon and Schuster, 1966.
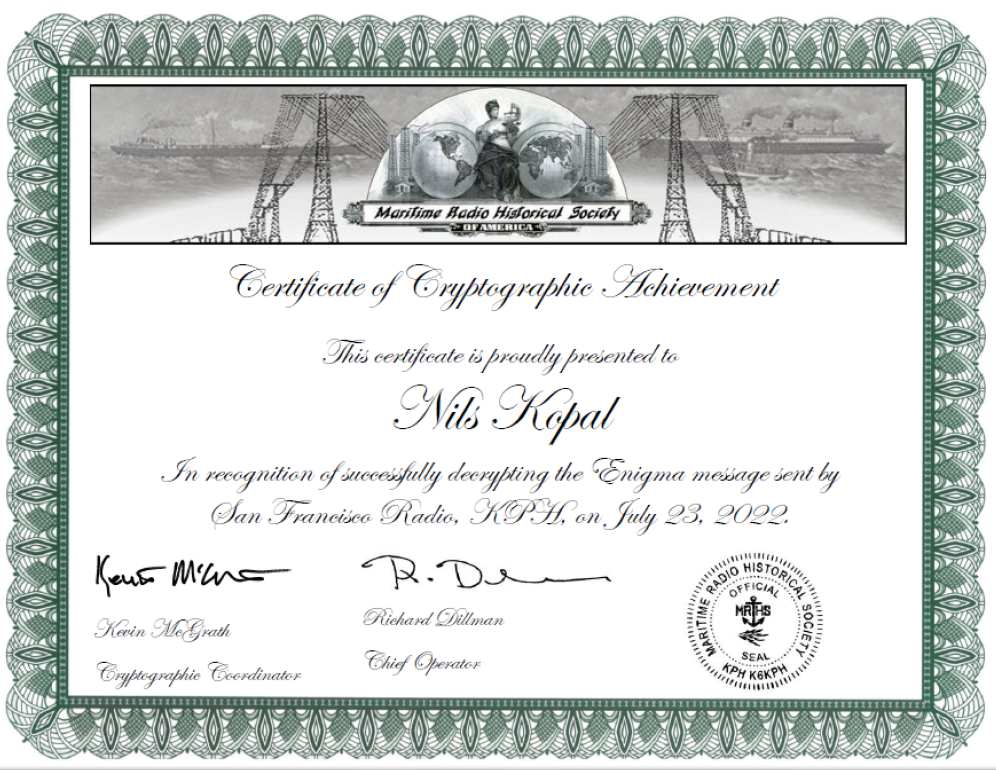
On Saturday the 23rd July 2022, the Maritime Radio Historical Society (MRHS) and the Cipher History Museum sent an Enigma-encrypted radio transmission via the KPH stations. I was able to receive the message and decrypt it using CrypTool 2. Message was sent via Morse (CW) frequencies and radioteletype (RTTY) frequencies.
In one of my YouTube videos, I explain how I received the message using KiwiSDR and how the Morse decoding in KiwiSDR and the decryption process in CrypTool 2 worked. I thank Tom Perera from the cryptocollectors group for providing the playbacked parts of the original audio recording of the transmission. Finally, I recorded the wrong audio device, thus, I only had the video recording of what I did.
I Decrypted an Enigma Message Transmitted by Radio
Despite not being the fastest decipherer, I am proud that I received a very nice certificate. I got it after sending the plaintext to the Martitime Radio Historical Society via email:
My certificate for deciphering the Enigma message from the MRHS
If you want to try to decrypt the Enigma message on your own, here is my received and Morse-decoded message (actual ciphertext in bold): FQ CQ DE KPH KPH KPH CQCQ CQ DE KPH KPH KPH CRYPTO MESSAGE FOLLOWS bt HQTRS FR FOCH 1914Z bt 100 bt BRV LTV bt VCXTY JRVHA NNKMO FGKIG OIPLM KVHVZ WDMIP XWRBX JKDWT KGZZA IWJVN QUTJF HPPWG KEDDQ QFEMT UKMQU IDIGF YUAJB RPPWS IBJCV EI[err][err]E CQ CQ CQ DE KPH KPH KPH CQ CQ CQ DE KPH KPH KPH CRYPTO MESSAGE FOLLOWS bt HQTRS FR FOCH 1914Z bt 100 bt BRV LTV bt VCXTY JRVHA NNKMO FGKIG OIPLM KVHVZ WDMIP XWRBX JKDWT KGZZA IWJVN QUTJF HPPWG KEDDQ QFEMT UKMQU IDIGF YUAJB RPPWS IBJCV E 5IH[err][err][err][err]EN SVAM bt I[err]
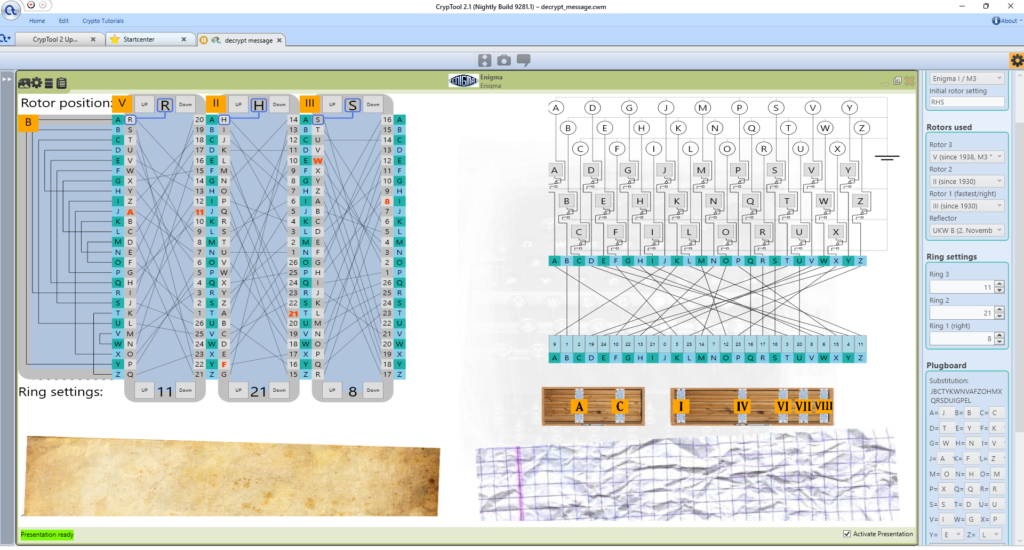
You can decrypt it using CrypTool 2 or any Enigma simulator. Here is a screenshot of the Enigma and settings in CrypTool 2:
Enigma set up for decryption of the message in CT2
I attended the International Conference on Historical Cryptology in June 2022. The conference took place in Amsterdam and was the first real conference, after the previous two HistoCrypts’ live events (2021 in Amsterdam and 2020 in Budapest) unfortunately had to be canceled due to the ongoing COVID-19 pandemic.
HistoCrypt 2022 was a great conference organized locally by Karl de Leeuw, a good colluege and great researcher who sadly passed away only three weeks after the conference in Amsterdam.
The conference featured 9 tracks, each track covering a different main topic, like crypto machines, historical documents, or machine learning. I had the opportunity to present together with Michelle Waldispühl our work about deciphering encrypted letters sent and received by Holy Roman Emperor Maximilian II in 1574 and 1575. Also, I was able to showcase CrypTool 2 in the poster session (I published a paper about new components in CrypTool 2). Jörgen Dinnissen presented our paper about a cipher of the Dutch East India company from 1674. Nino Fürthauer talked about our work with solving transposition ciphers using machine learning and Beáta Megyesi presented our work on analyzing thousands historical encryption keys.
All Talks Summarized in a YouTube Video
Today, I also created a YouTube video summarizing all talks given at HistoCrypt. You can watch it here:
Highlights of HistoCrypt 2022
Papers on HistoCrypt 2021 and HistoCrypt 2022 I (Co-)Authored
I co-authored six papers in the last two HistoCrypts being first-author in two:
Megyesi, B., Tudor, C., Láng, B., Lehofer, A., Kopal, N., & Waldispühl, M. (2022, June). What Was Encoded in Historical Cipher Keys in the Early Modern Era?. In International Conference on Historical Cryptology (pp. 159-167).
Fürthauer, N., Mikhalev, V., Kopal, N., Esslinger, B., Lampesberger, H., & Hermann, E. (2022, June). Evaluating Deep Learning Techniques for Known-Plaintext Attacks on the Complete Columnar Transposition Cipher. In International Conference on Historical Cryptology (pp. 82-90).
Kopal, N., & Esslinger, B. (2022, June). New Ciphers and Cryptanalysis Components in CrypTool 2. In International Conference on Historical Cryptology (pp. 127-136).
Dinnissen, J., & Kopal, N. (2021, August). Island Ramanacoil a Bridge too Far. A Dutch Ciphertext from 1674. In International Conference on Historical Cryptology (pp. 48-57).
Kopal, N., & Waldispühl, M. (2021, August). Two Encrypted Diplomatic Letters Sent by Jan Chodkiewicz to Emperor Maximilian II in 1574-1575. In International Conference on Historical Cryptology (pp. 80-89).
Leierzopf, E., Kopal, N., Esslinger, B., Lampesberger, H., & Hermann, E. (2021, August). A massive machine-learning approach for classical cipher type detection using feature engineering. In International Conference on Historical Cryptology (pp. 111-120).
My good friend and crypto author and blogger Klaus Schmeh made a really nice video about HistoCrypt 2022 (you can see me a couple of times in the video :-)), which took place last week in Amsterdam. I was also in Amsterdam and had the opportunity to present our work on Maximilian II ciphers together with Michelle Waldispühl, as well as to present CrypTool 2 in the poster session.
HistoCrypt 2022 was a great event where every talk was fascinating for crypto enthusiasts and researchers. Next year, HistoCrypt 2023 will likely be held in Munich, and the following HistoCrypt 2024 will likely be in Oxford.
Over the next weeks, I will probably also create a video and show some of the highlights of HistoCrypt 2022.
Recently, I created the “TextAES”, an AES-like cipher, where each building block of the original AES was replaced by a classical cipher. Of course, I also made a video about that and uploaded it onto my YouTube channel 🙂
After getting some feedback on my corresponding blog article here, I created the ASCII Enigma. An Enigma machine with 256-pin rotors. The basic idea was to create an Enigma machine that resembles the original design, but allows the encryption of more then the standard 26 Latin characters.
Three new Enigmas
In total, I developed three different new Enigmas and programmed these in C#: the Morse Enigma, the Enigma64, and the ASCII Enigma.
The Morse Enigma allows the encryption of more than 26 letters, but it still only uses symbols, that can be sent using Morse code. The main idea was, that this machine could have been built in the 1940s and Morse code was the state-of-the-art transmission media for messages. This Enigma machine has rotors with 38 pins. It allows the encryption of the letters A-Z, digits 0-9, and four special characters ( . , ! ? ).
The next Enima is the Enigma64. It allows the encryption of uppercase letters A-Z, lowercase letters a-z, digits 0-9, and two special characters ( . , ). My idea here is, that the created ciphertexts can still be represented using printable characters. By replacing . and , with / and +, the machine could easily by converted to a “Base64 Enigma”.
The last and most powerful Enigma I created is the ASCII Enigma. It allows the encryption of all 256 ASCII symbols. Since a lot of these are not printable, the resulting ciphertexts should be either converted to Base64, Hex values, or just stored in a binary file.
The C# Code
My C# code does not only allow to create these “fantasy” Enigmas, but also to create original Enigmas. I implemented the Enigma 1 for testing my code. Finally, one can also create Enigmas with only 1 or even 1,000 rotors. It can be easily done using only a few C# statements. Below you see how to create an Enigma 1:
int[] key = new int[] { 0, 1, 2 }; // A B C <--> we work on numbers instead of letters

//create plugboard with three plugs
int[][] plugs = new int[3][];
plugs[0] = new int[] { 0, 1 }; // plug A <-> B
plugs[1] = new int[] { 2, 3 }; // plug C <-> D
plugs[2] = new int[] { 4, 5 }; // plug E <-> F

//create rotors for machine
Rotor rotor1 = new Rotor(MapTextIntoNumberSpace(Enigma1.RotorI, Alphabets.Alphabet26), Enigma1.RotorINotches, 0);
Rotor rotor2 = new Rotor(MapTextIntoNumberSpace(Enigma1.RotorII, Alphabets.Alphabet26), Enigma1.RotorIINotches, 0);
Rotor rotor3 = new Rotor(MapTextIntoNumberSpace(Enigma1.RotorIII, Alphabets.Alphabet26), Enigma1.RotorIIINotches, 0);
Rotor reflector = new Rotor(MapTextIntoNumberSpace(Enigma1.UKWA, Alphabets.Alphabet26), null, 0);

//create machine
RotorMachine enigma1 = new RotorMachine(new Rotor[] { rotor1, rotor2, rotor3 }, reflector, new Plugboard(Alphabets.Alphabet26, plugs), Alphabets.Alphabet26);

//reset machine key
enigma1.Key = key;

//plaintext:
string text = "HELLOXWORLDXTHISXISXAXTESTXTEXT";
Console.WriteLine(text);

//encrypt/decrypt and print all to console
int[] plaintext = MapTextIntoNumberSpace(text, Alphabets.Alphabet26);
int[] ciphertext = enigma1.CryptText(plaintext);
Console.WriteLine(MapNumbersIntoTextSpace(ciphertext, Alphabets.Alphabet26));

//reset machine key
enigma1.Key = key;

int[] decrypted = enigma1.CryptText(ciphertext);
Console.WriteLine(MapNumbersIntoTextSpace(decrypted, Alphabets.Alphabet26));
Here, we create an Enigma 1 with three rotors (I, II, III), a plugboard, and the reflector UKWA. My implementation does not take the “rings” into account since these are cryptographically irrelevant. And it eased the code :-). If you want to have an implemention of the Enigma with rings, have a look at CrypTool 2.
My YouTube Video and the Source Code
Of couse, I also made a video about the ASCII Enigma:
I Created an Enigma Machine with 256-Pin Rotors – The ASCII Enigma
If you are interested in getting your hands on the source code, I created a GitHub project where you can get it from: https://github.com/n1k0m0/ASCIIEnigma
In my newest video on “Cryptography for everybody”, I explain how zero-knowledge proofs and protocols work. A zero-knowledge proof or protocol is a method by which one party (usually Peggy P) can prove to another party (usually the verifier Victor V) that they know a value (e.g. a secret key or password) without actually revealing it.
First, we discuss the classical cave example by Quisquater: Here, Peggy wants to prove to Victor that she knows how to open a secret door in a cave. But only to Victor and not to anyone else.
Then, we have a look at a real zero-knowledge protocol: the Fiat-Shamir Protocol. This protocol works with modular arithmetic. Peggy has to create a private key s and register her public key v = s² with a trusted third party. Then, Victor can challenge her with a simple protocol. How this works, I explain in the video.
Finally, we have a look at the zero-knowledge simulation in CrypTool 2. Watch the video here:
Zero-Knowledge Proof Explained
“Cave” paper by Quisquater: Quisquater, Jean-Jacques, et al. “How to explain zero-knowledge protocols to your children.” Conference on the Theory and Application of Cryptology. Springer, New York, NY, 1989.
Feige-Fiat-Shamir protocol: Feige, Uriel, Amos Fiat, and Adi Shamir. “Zero-knowledge proofs of identity.” Journal of cryptology 1.2 (1988): 77-94.
Generation of “safe” primes in CT2 using the RSA KeyGenerator component
I recently got some interesting feedback to the “Break reduced RSA” YouTube video I made some time ago. Of course I used CrypTool 2 (CT2) in that video. One viewer asked me, why we chose to generate non-safe primes, as well as if the quadratic sieve component of CT2 is able to break RSA challenge numbers. My answer to the second question: Since we have a quite old implementation of msieve (the library we use) converted to C# long ago, I don’t think the factorization algorithm is as powerful as the current state-of-the-art factorization libraries. Nevertheless, it is “good enough” to show how to break RSA (up to N in range of 2^300).
The answer to the safe prime question: Good question! I never thought of generating such numbers in CT2 and thought standard prime numbers are ok for CT2. I mean, it is a tool for education and not meant for any security purposes. Nevertheless, in real world applications you use large primes for RSA with additional requirements: They should be safe. So I updated the RSA KeyGenerator component to also allow the generation of safe primes. But are safe prime numbers still needed with RSA modules in the range of 2^2048 and above? For the current state-of-the-art of RSA factorization, you may have a look at https://en.wikipedia.org/wiki/RSA_Factoring_Challenge.
But what is a safe prime?
A number p is a prime number, if it is only divisible by itself and by 1. For example 13 is a prime number, or 17, or 23, … etc. A “safe prime” number p is a number, that is prime AND (p – 1) / 2 is also a prime number which we then call a Sophie Germain prime. An example for a safe prime is 23, because (23 – 1) / 2 = 11 is a Sophie Germain prime. Safe prime numbers are more resistant against some factorization methods, which could be used to factorize the RSA’s N (which is the product of two large primes p and q).
But are safe primes really needed for RSA?
I questioned that myself and found a paper by Rivest, who is the R in RSA. Already in 1999, Rivest stated that: “We find that for practical purposes using large “random” primes offers security equivalent to that obtained by using “strong” primes. Current requirements for “strong” primes do not make them any more secure than randomly chosen primes of the same size. Indeed, these requirements can lead a general audience to believe that if a prime is “strong” that it is secure and that if it isn’t “strong” then it must be “weak” and hence insecure. This simply is not true.” [1]
Rivest speaks about “strong” primes, not about safe primes. Strong primes have additional properties, from which “safe” primes fullfil one. But today, the usage of just “random” primes is good enough to keep RSA secure, since the primes are so large, that the properties for “strong” and “safe” are negligible. The “safe” property for primes was introduced to counter special factorization algorithms, like Pollard-Rho. But the modules we use today with RSA are too large to be factored with e.g. Pollard-Rho.
Nevertheless, now we have the choice in CT2 to generate either “random” or “safe” primes. Also, the RSA KeyGenerator uses a cryptographic random number generator during the generation of the RSA keys. In the CT2 workspace shown at the beginning of the blog article, we generate a 1024 bit RSA key and set the generator to “safe” prime generation. The prime test components evaluate the generated primes p and q and if both are “green” this means that the primes are safe.
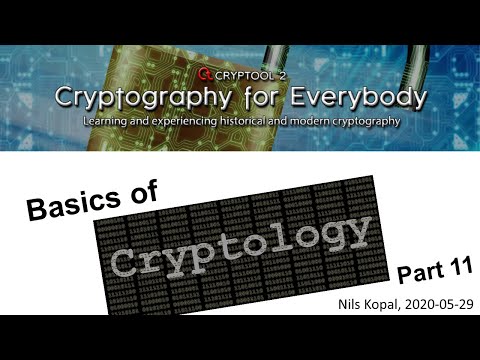
You may be interested in my RSA YouTube video:
Basics of Cryptology – Part 11 (Modern Cryptography – Asymmetric Ciphers – RSA)
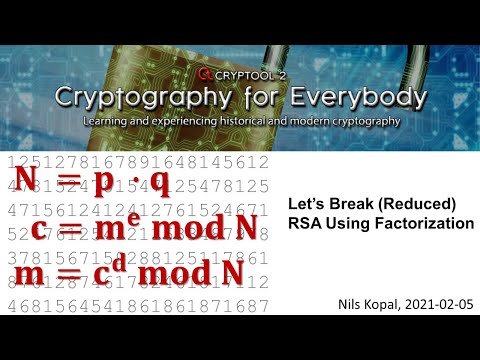
And you may also be interested in my “How to break reduced RSA” YouTube video:
Break (Reduced) RSA Using Factorization
[1] Rivest, Ronald L., and Robert D. Silverman. “Are Strong Primes Needed for RSA?” IN THE 1997 RSA LABORATORIES SEMINAR SERIES, SEMINARS PROCEEDINGS. 1999.
Today, I updated the “transposition analyzer” component of CrypTool 2 (CT2) to make its usage more convenient. The analyzer allows the cryptanalysis of ciphertexts that are encrypted using the columnar transposition cipher. It was written some time ago in the early days of CT2 by some of my commolitons when I was doing my masters.
The CrypTool 2 transposition analyzer component now supports keylength ranges
It always bugged me that you needed to restart the analyzer when you wanted to analyze different key lengths. For example, if you assumed that a ciphertext had been encrypted using a columnar transposition cipher, but you were unsure which key length had been used (e.g. between 5 and 15), you had to restart it for any of the assumed key lengths.
Now, its a matter of setting minimum and maximum key lengths, and the analyzer will test all lengths of the defined range 🙂
Btw, the transposition analyzer supports different cryptanalysis methods/heuristics: brute-force for smaller key lengths, genetic algorithm and hillclimbing for longer key lengths. Also, if you have a crib (a part of known plaintext), the crib analysis can be used.
But besides simply just updating the component, I fixed a few bugs and generally improved the C# code a bit 🙂
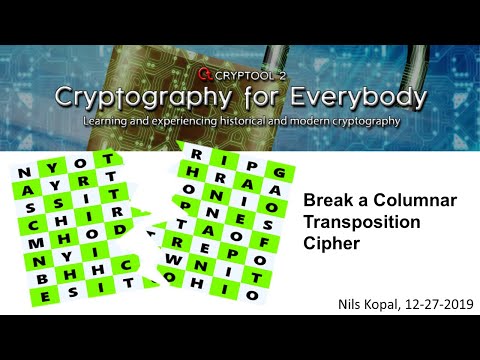
If you want to see how to use the transposition analyzer of CT2, I created a video about it in the past:
Break a Columnar Transposition Cipher
Probably, I will also create a new video about columnar transposition ciphers and the updated transposition analyzer in the near future.
We published some years ago a paper about cryptanalysis of the columnar transposition cipher in Cryptologia [1].
Finally, if you want to simply encrypt or decrypt using the columnar transposition cipher, you may have a look at the nice implementation in CrypToolOnline: https://www.cryptool.org/en/cto/transposition
[1] Lasry, George, Nils Kopal, and Arno Wacker. “Cryptanalysis of columnar transposition cipher with long keys.” Cryptologia 40.4 (2016): 374-398.
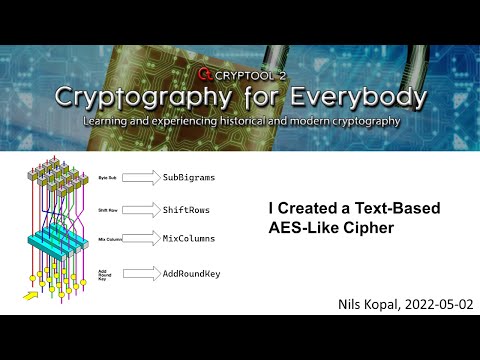
Can you build a cipher with the structure of the Advanced Encryption Standard (AES), our current standard modern symmetric cipher, but only use classical ciphers? I asked myself this question when I implemented AES in C# as a preparation for my upcoming AES videos on my YouTube channel in 2021.
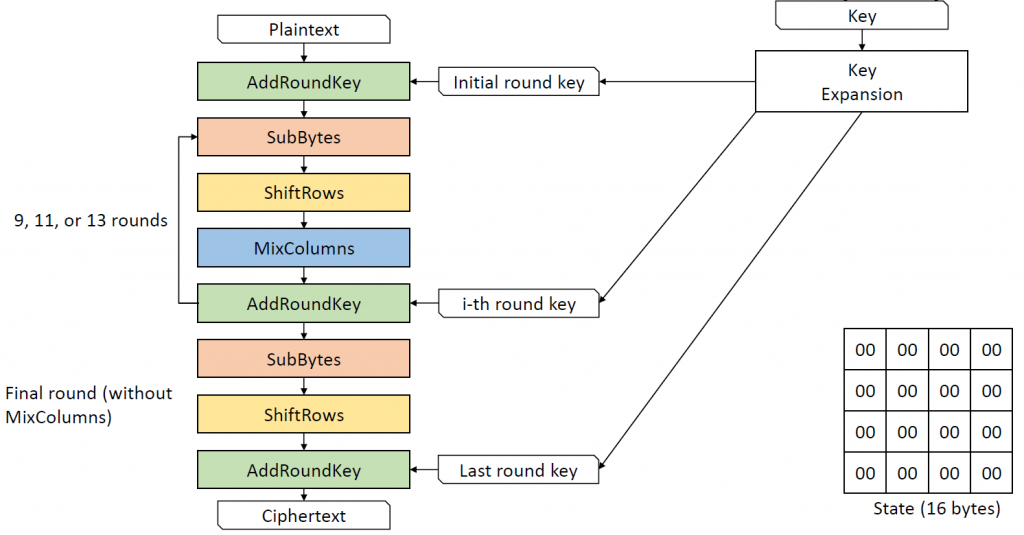
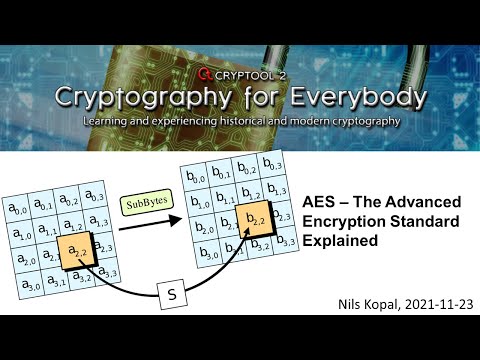
AES’ structure (10 rounds for AES-128) consists of 4 different building blocks: 1) AddRoundKey, 2) SubBytes, 3) ShiftRows, and 4) MixColumns:
AES structure
The AddRoundKey building block adds a round key to the state array of 16 bytes (or plain and/or ciphertext) using XOR. The SubBytes building block substitutes each byte using AES’ S-Box, the ShiftRows building block performs a shift of the rows of the state array, and the MixColumns building block mixes the columns of the state array by multiplying each “vector” with an invertible matrix in the finite field GF(2^8).
When I implemented each of these four steps, I was reminded of some classical ciphers: AddRoundKey reminded me of an additive cipher, SubBytes reminded me of a simple substitution cipher, MixColumns reminded me of a transposition cipher, and the matrix multiplication finally reminded me of a Hill cipher.
Thus, I changed the inputs (plaintext and key) and the output (ciphertext) of the AES to simple text (just letters from A to Z), exchanged AddRoundKey with an additive cipher (using MOD 26), exchanged SubBytes by SubBigrams (a bigram substitution cipher), I kept ShiftRows as it was, and exchanged MixColumns with a 4×4 Hillcipher (also using MOD 26). The “TextAES” was born :-).
To also allow decryption, I computed the inverse S-Box (an inverse lookup table for the bigram substitution cipher) and an inverse matrix for the Hill cipher.
I kept the key expansion more or less as it was, but with text, and also used the bigram substitution and replaced its round constants by “AAAA”,”BAAA”,”CAAA”, etc.
Finally, I was convinced that you can create an AES-like cipher using only classical ciphers :-).
If you are interested in details of this self-made crazy cipher, have a look at the video I made about it:
I Created a Text-Based AES-Like Cipher
If you are interested in details of the real AES, you may also have a look at my other two videos about AES and AES key schedule:
Finally, here is the original publication of AES: Daemen, Joan, and Vincent Rijmen. The design of Rijndael. Vol. 2. New York: Springer-verlag, 2002.
Nils
We use cookies on our website to give you the most relevant experience by remembering your preferences and repeat visits. By clicking “Accept All”, you consent to the use of ALL the cookies. However, you may visit "Cookie Settings" to provide a controlled consent.
This website uses cookies to improve your experience while you navigate through the website. Out of these, the cookies that are categorized as necessary are stored on your browser as they are essential for the working of basic functionalities of the website. We also use third-party cookies that help us analyze and understand how you use this website. These cookies will be stored in your browser only with your consent. You also have the option to opt-out of these cookies. But opting out of some of these cookies may affect your browsing experience.
Necessary cookies are absolutely essential for the website to function properly. These cookies ensure basic functionalities and security features of the website, anonymously.
Cookie
Duration
Description
cookielawinfo-checkbox-analytics
11 months
This cookie is set by GDPR Cookie Consent plugin. The cookie is used to store the user consent for the cookies in the category "Analytics".
cookielawinfo-checkbox-functional
11 months
The cookie is set by GDPR cookie consent to record the user consent for the cookies in the category "Functional".
cookielawinfo-checkbox-necessary
11 months
This cookie is set by GDPR Cookie Consent plugin. The cookies is used to store the user consent for the cookies in the category "Necessary".
cookielawinfo-checkbox-others
11 months
This cookie is set by GDPR Cookie Consent plugin. The cookie is used to store the user consent for the cookies in the category "Other.
cookielawinfo-checkbox-performance
11 months
This cookie is set by GDPR Cookie Consent plugin. The cookie is used to store the user consent for the cookies in the category "Performance".
viewed_cookie_policy
11 months
The cookie is set by the GDPR Cookie Consent plugin and is used to store whether or not user has consented to the use of cookies. It does not store any personal data.
Functional cookies help to perform certain functionalities like sharing the content of the website on social media platforms, collect feedbacks, and other third-party features.
Performance cookies are used to understand and analyze the key performance indexes of the website which helps in delivering a better user experience for the visitors.
Analytical cookies are used to understand how visitors interact with the website. These cookies help provide information on metrics the number of visitors, bounce rate, traffic source, etc.
Advertisement cookies are used to provide visitors with relevant ads and marketing campaigns. These cookies track visitors across websites and collect information to provide customized ads.