In September 2025 I was invited to speak at MuseumsUNI in the Museum Schloss Rheydt in Mönchengladbach. In front of about 60 pupils I gave a talk called “Geheime Botschaften knacken – Secret Message Cracking”. I’ve now re-recorded it in English for my YouTube channel “Cryptography for everybody”, and I’d like to briefly introduce it here.
What the talk is about
We start with a simple question:
How can we read an encrypted historical letter if we don’t know the key?
To answer it, I first show some basics using classical ciphers such as the Caesar cipher and monoalphabetic substitutions. We look at why big key spaces don’t automatically mean security, and how letter frequencies and patterns still betray the underlying language.
From there I move on to the modern tools we use today. With CrypTool 2 we can:
compute letter and n-gram statistics,
run heuristic attacks like hillclimbing,
and test thousands of key candidates per second.
This is exactly the kind of software support we developed and used in the DECRYPT project and in my daily research (in the new DESCRYPT projekt :-)).
Three historical crypto stories
The heart of the talk is three short case studies:
Maximilian II’s election letters (1570s) – encrypted with a mixture of symbols, numbers and special characters; together with Michelle Waldispühl we reconstructed the system and read the emperor’s “campaign strategy”.
The Ramanacoil cipher (1674) – a VOC letter sent from Ceylon to the Netherlands, using alchemical symbols and code signs for places like Ceylon and Ramanacoil, decrypted with the help of an original key and CrypTool 2.
The UCL Brougham letter (1724) – discovered on social media, initially looked like a complex homophonic system, but turned out to be a surprisingly simple numeric substitution once we removed the nulls.
Each example shows a different mixture of paleography, language expertise and computer-based cryptanalysis. I also have detailed blog articles on this blog 🙂
Why you might enjoy the video
If you are curious about:
how historical ciphers actually worked,
how we combine archives, software and a bit of stubbornness,
and how “mysterious symbols” slowly turn into readable text,
then this talk might be fun for you. It’s aimed at interested students, developers and anyone who likes a mix of history, cryptography and a bit of detective work.
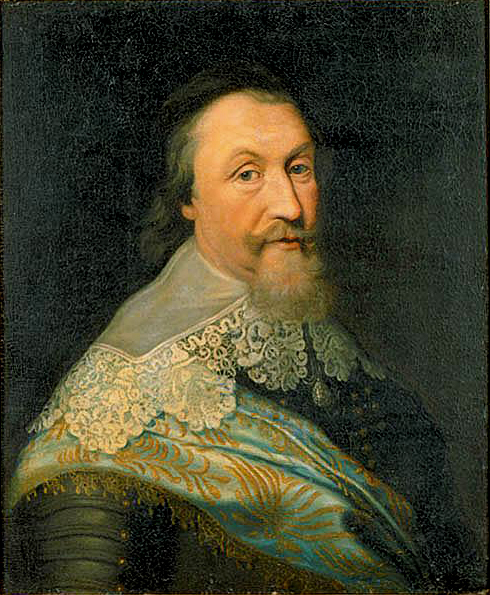
Within the collections of the Riksarkivet (the Swedish National Archives) lies a four pages long letter that probably had remained undeciphered for centuries. It was written in 1637 by nobleman Sigismund Heusner von Wandersleben to the Swedish High Lord Chancellor Axel Oxenstierna. Heusner encrypted parts of the letter with a complex cipher and it presented a challenge, which my colleague Michelle Waldispühl and I tackled. The letter was first brought to our attention by our DECRYPT project leader, Beáta Megyesi, who discovered it during her research in the archives and shared it with us. This blog post discusses our systematic approach to cryptanalyze this historical document and the insights we gained from it.
Axel Oxenstierna af Södermöre, 1583-1654. Image taken from Wikipedia
The Discovery of the Letter
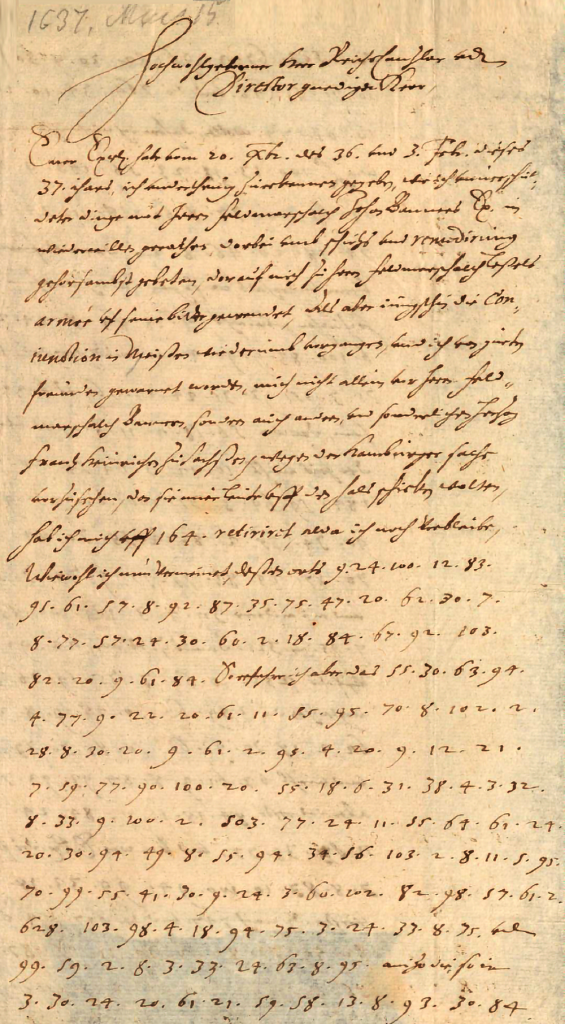
The letter was part of the “Oxenstierna samlingen”, a collection of correspondence preserved in the Riksarkivet (the Swedish National Archives). This particular letter, part of a series written by Heusner von Wandersleben between 1632 and 1638, was the only one encrypted, maybe hinting at the importance of its contents. The DECRYPT project leader Beáta Megyesi found the letter and knew that Michelle and me already successfully worked on German historical encrypted letters. Thus, she brought it to our attention, and we began our collaborative effort to decipher it, which resulted in a mutual research paper (see [1]) as well as a poster, which we, Michelle and me, presented together on the HistoCrypt 2024 in Oxford. The letter, of course, has its own entry in the DECODE database, which you can find here [2]. In the following image, you can see the first page of the partially encrypted letter from 1637.
First page of the partially encrypted letter sent from From German Nobleman Sigismund Heusner von Wandersleben to Swedish Chancellor Axel Oxenstierna during the Thirty Years’ War. The letter is located in the Riksarkivet (the Swedish National Archives).
The Cryptanalysis Process
Our first task was to understand the nature of the encryption. The letter’s ciphertext consisted of numbers separated by dots, indicating the use of a homophonic substitution cipher. This cipher type is particularly challenging because it employs multiple so-called homophones to represent single letters, thereby obscuring the original letter frequency as well as patterns that are typically exploited in cryptanalysis of hand ciphers.
To begin the actual cryptanalysis, we transcribed the entire letter with the help of Transkribus.ai, a tool designed for the recognition of historical handwriting. Given the challenges posed by the 17th-century German script, which was written in “Deutsche Kurrent Schrift” (German Kurrent writing), this step required meticulous attention to detail, since the results of the machine-based transcription were good but far from perfect. Every digit and symbol was carefully validated to ensure accuracy in the transcription. We checked of the ciphertext symbols (the numbers) manually and had to correct many of them.
With a complete and accurate transcription in hand, we used to CrypTool 2 (CT2), our open-source cryptanalysis software, that we have frequently employed in our prior work. The Homophonic Substitution Analyzer of CT2 was our primary tool, allowing us to perform semi-automated cryptanalysis of the letter. Through multiple iterations of cryptanalysis and refinement of the assignments of plaintext to ciphertext symbols, we gradually began to uncover portions of the plaintext. During the cryptanalysis, we identified 85 distinct homophones used in the ciphertext. These homophones were not evenly distributed—some letters, such as ‘e’, were represented by as many as eight different numbers, while others had only one. This uneven distribution suggested a deliberate attempt by the cipher creator to complicate decryption efforts. Additionally, the absence of word separators and punctuation in the ciphertext parts added to the complexity, making it difficult to determine sentence boundaries and syntactic structures.
Nomenclatures and the Limits of Decipherment
A particularly aspect of the letter was the presence of nomenclature elements—three-digit codes embedded within the ciphertext. These elements likely represented names of individuals or places, critical pieces of information that the sender wanted to protect with additional security. Despite our best efforts, these nomenclature elements remained undeciphered. The only possibility to decipher these is either to find the original key or guess their meaning with the help context. We searched in the DECODE database as well as in the “Hessisches Staatsarchiv” (Hesse State Archive), which holds many original German keys from the Thirty Years’ War, but we were not able to find the original key.
The use of nomenclature elements is consistent with the regular practices of the time, particularly in diplomatic and military communications. Nomenclature elements and their corresponding tables ultimately lead to the invention of code books, which were mainly in use in the 19th and early 20th century.
The Deciphered Letter and a ChatGPT Translation
Here is the unedited transcribed and deciphered German version of the original letter. An English translation generated with ChatGPT is below. The German text still contains errors as well as the undeciphered nomenclature elements (numbers). Also, the originally encrypted parts are all written uppercase:
1637, Mai 15 Hochwohlgeborner Herr Reichchanzlar undt Director gnediger Herr, Eurer Excell. habe vom 20. Xmbr. des 36. und 3. Febr. dieses 37. ihars ich vnderthenig zuerkennen gegeben, wie ich vnuerrichtetdeter dinge mit Herrn Feldmarschalch Johan Banners Ex. in wiederwillen gerathen, darbei vmb schutzs und remedirung gehorsambst gebeten, darauf mich zu Herrn Feldmarschalch Leßels arm´ee vf seine bitte gewendet. Als aber jüngsthin die Coniunction in Meißen wiederumb vorgangen, sond ich von gueten freunden gewarnet worden, mich nicht allein vor Herrn Feldmarschalch Bännnern, sondern auch anderen, und sonderlichen Hern Frantz Heinrichen zu Sachsßen, wegen der Hamburger Sache vorzusehen, da sie mier leute vff den hals schicken wolten, hab ich mich vff 164. retiriret, alda ich noch verbleibe. Wiewohl ich nun vermeinet, dessen orts DIE ALTE DEUOTION GEGEN DIE CRON ZU FINDEN. So erfahre ich aber das HERR UND KNECHT SEHR GEENDERT UND AM GANZEN HOFE AUSSER DER 503. NICHTT EINER MEHR UFFRECHT SCHWEDISCH, IA DER 628. FAUORISIREI und CARESRIRET aizo die so in SEINEM ABWESEN dem 503. ZUWIEDER GEWESEN und die 764. UBERGEBEN wollen, daher ich mich nicht wenig Verwundert wie L.EWOLFF DERORTEN NEGOCIIREN SONNEN, deme es furwahr an nottieftigen vnderhalt, in? sogar das ich darfur erschrocken, h¨ochlichen gebracht?, UON EINEM FELDZUG wirdt geredet, WOHIN IST STILL. Es kan aber nichts großes sein, dan die FORCE nicht alda, und man der Zeit nicht BASTANT 808. 385. 184. AUS DEM LANDT ZU TREIBEN da 503. SOLL IN DAS FELD und ein anderer AUS DEM LANDT in 321. damit ist es ein KUCHEN Vff die 255. BESTALLUNG ingleichen die 289. GELDER machet man GROSSES HERANTZ und viehl REDENS UON. Es ist aber das erste NOCG NICHT CLAR und kan was E. Ex. die sache mit SELBER CRON dero hohen verstandt nach 747. und den 617. RECHT IM DIRECTORIO FASSEN schon alles dergestalt gemacht werden, das man DOCH DIE CRON 708. SUCHEN und von derselben DEPENDIREN UND BITTEN muss von deren MAN SICH SONSTEN AUSZUHALFETERN GEMEINET. Wegen des andern ist kein vberflues, und erfolget sparsam genug, das sich also die sachen wohl geben, Euer Ex. habe meiner schuldigkeit nach ich dieses mit wenigen gehorsamlichen anfuegen wollen, die ich des allerh¨ochsten schvzs? und dero zu beharrlich gnaden mich vnderthenig empfehle und dero resolution mit sachßen erwarte, Vol. CASSEL den 15. May 1637. Eurer Excelz. Werthiger gehorsamer diener 384. ich habe mich des EWOLFREN seines Comptorii? et? Man hat hier in der aller größen geheimb etlich 385. CENTNER METALLISCHE SPEISSE ZUSAMMEN GESCHMELZET und solche verdecket auf 147 gef¨uret, daselbst etliche schon hierzu gemachte STUCKE ZU TAUSCHEN und werden mit dem UFFBRUCH wie ich in vertrauen vernommen den nechsten sich eihlen undt ALLE ABWERTS GEHEN. Alhier wie ich Vermercke wirdt IOHAN VON UFFELN COMMENDANT 571. GUNTEROT aber GEHET MIT ANDEREN ZU FELDT varleßet sich mercken, ob seye etwas UON 703. ALHIER wie auch ANDERE und haben GROSSE HOFFNUNG. Dieses wird gleich bey schließung meines schreibens ahn? EWOLFFEN bey einem gueten ort geschrieben.
And here, I used ChatGPT to translate the letter in the following. Keep in mind that the translated text is an AI-generated translation, where I asked ChatGPT to keep the uppercase written words to show the originally encrypted parts. Clearly, the translation can contain (more) errors introduced by the AI:
1637, May 15 Noble Lord Chancellor and Director, gracious Sir, Your Excellency, on December 20 of the year 1636 and on February 3 of this year 1637, I humbly informed you of how I, due to unresolved matters, fell into conflict with His Excellency Field Marshal Johan Banner and respectfully requested protection and remedy. Consequently, I turned to the army of Field Marshal Leßel at his request. However, when the conjunction in Meißen recently occurred again, I was warned by good friends not only to be cautious of Field Marshal Banner but also of others, particularly Lord Franz Heinrich of Saxony, concerning the Hamburg matter, as they intended to send men after me. I have therefore retreated to 164., where I still remain. Although I expected to find THE OLD DEVOTION TO THE CROWN in this place, I have discovered that MASTER AND SERVANT HAVE CHANGED GREATLY and at the entire court, except for the 503., THERE IS NOT ONE WHO REMAINS LOYAL TO SWEDEN; INDEED, THE 628. IS FAVORED AND FLATTERED, meaning those who, in HIS ABSENCE, stood AGAINST the 503. and want to hand over the 764. Therefore, I am quite astonished how L. EWOLFF can negotiate there, as he truly lacks the most essential resources, so much so that I am greatly alarmed. There is talk of a military campaign, WHERE TO IS UNCLEAR. However, it cannot be anything significant, as the forces are not present there, and at present, one is not SUFFICIENTLY 808. 385. 184. TO DRIVE OUT OF THE LAND. The 503. SHALL GO INTO THE FIELD and another OUT OF THE LAND to 321., which makes it a game. On the 255. APPOINTMENT as well as the 289. FUNDS, great attention is being paid and much talk is made. However, the first matter is NOT YET CLEAR and what Your Excellency can make of the situation with THE SAME CROWN according to your high understanding of the 747. and the 617. LAW IN THE DIRECTORY, everything could already be arranged in such a way that one MUST STILL SEEK THE CROWN 708. and DEPEND AND REQUEST from it, from which one otherwise intended to distance oneself. As for the other matter, there is no excess, and it follows sparingly enough that things may well turn out as expected. Your Excellency, I have dutifully wanted to add a few obedient words, in which I humbly recommend myself to the highest protection and your continuous grace, and await your decision with Saxony. Vol. CASSEL, May 15, 1637. Your Excellency’s most worthy obedient servant, 384. I have used the EWOLFFREN’s office? et? Here, in the greatest secrecy, about 385. CENTNER OF METALLIC FODDER HAS BEEN MELTED TOGETHER and covertly transported to 147., where several pieces already made for this purpose are to be exchanged, and with the DEPARTURE, as I have learned in confidence, they will hasten in the next few days, and ALL WILL GO DOWNWARD. Here, as I note, IOHAN VON UFFELN will become COMMANDANT 571., but GUNTEROT WILL GO TO THE FIELD with others. It remains to be seen whether anything of 703. will occur here, as well as with OTHERS, and they have GREAT HOPE. This will be written to EWOLFFEN at a good place immediately upon the closing of my letter.
On the last page of the letter, the name of the German city Kassel is also encrypted. This indicates, that the letter was probably sent from or at least written in Kassel.
What the Letter Revealed in a Nutshell
Despite the challenging cryptanalysis and open problems with the nomenclature elements, we were able to decipher significant portions of the letter. The revealed plaintext provided insights into the political and military concerns of the era. Sigismund Heusner von Wandersleben, who served as a Swedish counselor and war commissioner, wrote to Axel Oxenstierna about ongoing conflicts with other military leaders, including Johan Banér and Franz Heinrich of Saxony.
The letter detailed strategic retreats and expressed concerns about potential threats from various factions involved in the Thirty Years’ War. Heusner von Wandersleben sought guidance from Oxenstierna, reflecting the high stakes and pressures faced by those managing the war effort. The letter also addressed financial matters and the deployment of military forces.
Interestingly, the used encryption did not hide all secrets, which were shown within the text. Many information, that seem really important to us, were not encrypted by Heusner while some parts, which contained non-confidential information, were encrypted.
Challenges and Insights Gained
The process of cryptanalyzing and deciphering this letter was both challenging and rewarding. The high number of homophones and the uneven distribution of symbols added a very significant level of difficulty to our cryptanalysis. The absence of an original cipher key meant that we had to rely entirely on CrypTool 2 and the Homophonic Substitution Analyzer to uncover the plaintext. Also, since Michelle is a great expert of old German dialects, her work on the language of the letter and help with the deciphering was crucial. Without her, I would not have been able to decipher and understand the letter to the degree which we were able as a team. So as good as your cryptanalytical tools and efforts may be, there is nothing that can replace a language expert helping you :-).
Our Conclusion
Our combined work on deciphering this 1637 letter has provided interesting insights into the cryptographic practices during the Thirty Years’ War, especially in the German-Swedish relation between Oxenstierna and Wandersleben. The partial decipherment of the letter showed parts of their political and military strategies, while the unresolved nomenclature elements still keep many of their secrets, which we were not able to reveal. Also, this project again shows the importance of interdisciplinary collaboration in historical cryptography, combining the linguistic expertise with modern cryptanalytic methods and algorithms.
As I continue my research, I look forward to further exploring the complexities of historical ciphers like this one. Finally, the journey to fully decipher this letter is far from over, since the nomenclature elements are still not deciphered. We hope to find the original key, thus, we are also able to reveal their meanings.
References
[1] Waldispühl, Michelle & Kopal, Nils. (2024). Decipherment of a German encrypted letter sent from Sigismund Heusner von Wandersleben to Axel Oxenstierna in 1637. 10.58009/aere-perennius0116. [2] DECODE Record 4332: The letter and our analysis results in the DECODE database. URL: https://de-crypt.org/decrypt-web/RecordsView/4332
In a routine cataloging task at the University College London (UCL) Special Collections, an interesting and mystical 1724 encrypted letter came to light, which captured my attention. As someone deeply involved in the field of historical cryptography, I was drawn into the process of decrypting this document. This blog article details my journey in decrypting the letter, the methods I employed, the historical context, and the insights we gained.
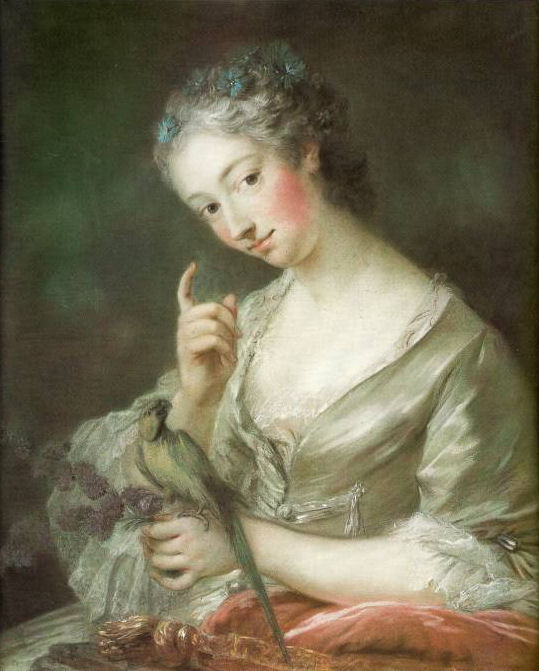
Portrait of Jeanne-Agnès Berthelot de Pléneufs after Jean-Baptiste van Loo, 18th century (source Wikipedia)
Discovery of the Letter and Contact to the Archive
Katy Makin, an archivist at UCL, discovered the encrypted letter while cataloging the Brougham Archives. These archives are primarily associated with Henry Brougham, 1st Baron Brougham and Vaux, a notable British statesman of the 19th century. However, the letter predates Brougham’s birth by over 50 years, indicating it might be linked to one of his ancestors involved in the political affairs of the early 18th century.
Katy decided to share images of the letter on social media, specifically on X (formerly known as Twitter), in hopes of finding someone able to decipher it. I came across these images on X, and given my background in decrypting historical documents, I was immediately captivated by the challenge.
After I was able to decipher the first pages shown on X, I immediateley realized that there have to be more. I contacted Katy, showed her my decryption and also asked for more pages. She sent all pages to me which I also was able to decipher. Unfortunately, it also turned out that some pages are missing since the letter has no proper ending and indicates that. Ultimatively, Katy and I wrote a research article about the letter and published it on the HistoCrypt 2024 in Oxford. I also presented the letter in the poster session on the HistoCrypt which I really enjoyed.
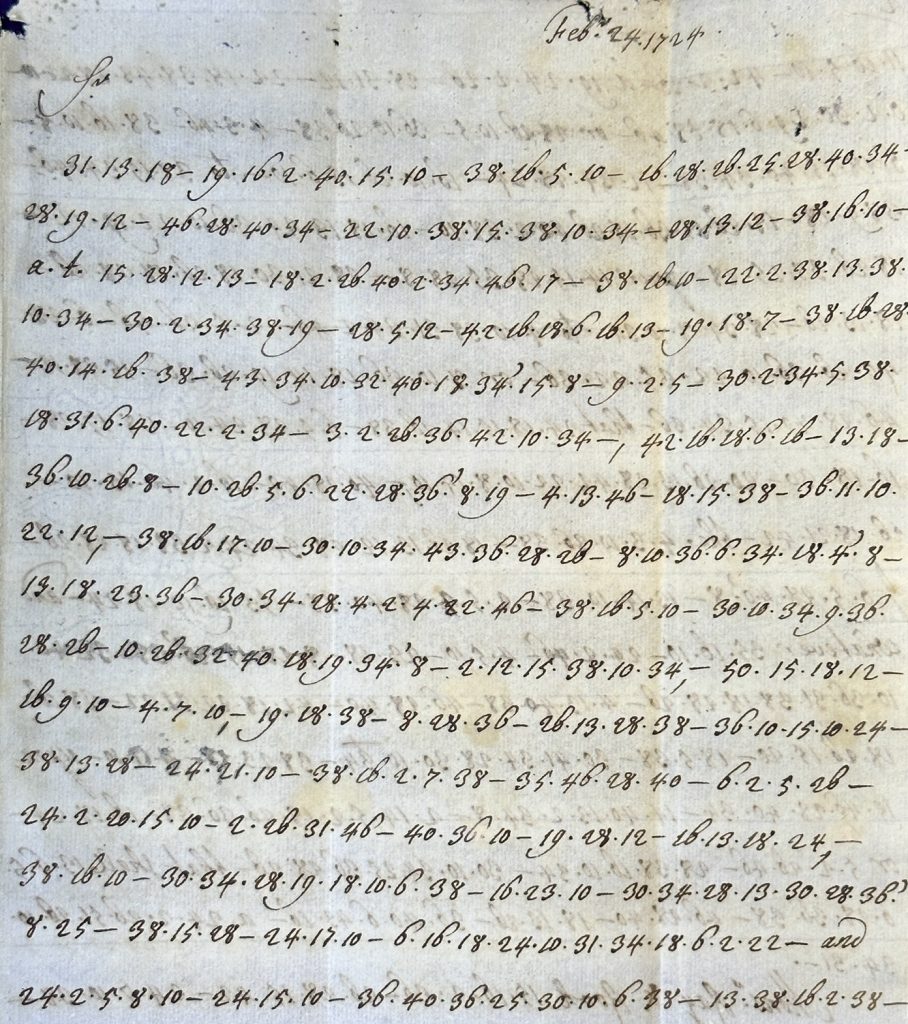
First Page of the Encrypted Letter
Initial Analysis and Hypotheses
When I first examined the letter, it appeared to be encrypted using a homophonic substitution cipher—a method designed to obscure letter frequencies by using multiple symbols for individual letters. The letter consisted of 16 pages filled with numbers, dots, and dashes, with a few plaintext words like “and” and “the” and names such as “Mons Garnet and Gee” standing out. This mixture of encryption and plaintext hinted at a complex approach that piqued my curiosity.
Given the structure and content, I initially hypothesized that the letter might use a homophonic substitution cipher, where different numbers or symbols corresponded to letters or groups of letters. This assumption seemed plausible, especially with 52 different numbers appearing throughout the text, which might represent the plaintext alphabet and additional syllables or words.
The Decryption Process
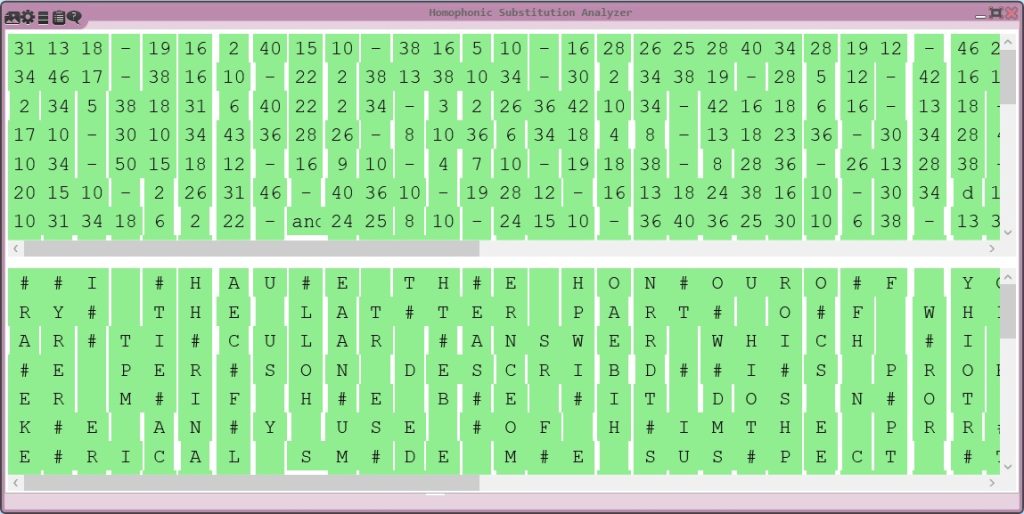
To begin the decryption, I first transcribed the entire text into a digital format, recording every number, dot, and dash to ensure I had an accurate replica of the original document. This transcription allowed for a detailed analysis using CrypTool 2, our open-source software that I frequently use for analyzing and breaking classical ciphers, e.g. in videos on my YouTube channel.
My initial attempts at automated decryption using the Homophonic Substitution Analyzer provided some partial results, but there were still many nonsensical sequences, which led me to suspect the presence of nulls. These symbols are often used to mislead those attempting to decrypt the text, adding an extra layer of difficulty.
Through further cryptanalysis, I discovered that the encryption was simpler than I had initially thought. After identifying and removing the nulls, I realized that the letter used a basic monoalphabetic substitution cipher, where even numbers corresponded to letters in a straightforward ascending order (e.g., A = 2, B = 4, C = 6, etc.). With this finding, I was able to successfully decrypt the main content of the letter.
Letter and its Decryption in CrypTool 2’s Homophonic Substitution Analyzer
Unresolved Elements and Historical Context
Despite the successful decryption of most of the text, certain elements remained unresolved. The letter contained “nomenclature elements”— special codewords likely used to hide e.g. the identities of people and places. These codewords, such as “Mons Garnet and Gee” or “Mons Grandy and Gay,” appeared in pairs and often featured alliteration. Their exact meaning remains unclear, suggesting these elements were intended to provide additional security, perhaps related to sensitive political or military issues.
The letter was written during a time of significant political tension in Britain, particularly concerning the Jacobite efforts to restore the Stuart dynasty to the throne. The use of encryption shows the sensitive nature of the topics discussed, reflecting the secretive communications common during this turbulent period.
Content of the letter
Here is the decryption of the first two pages of the letter:
Page 1: Feb 24 1724I HAUE THE HONOUR OF YOUR LETTER OF THE ?? OF IANUARY THE LATTER PART OF WHICH I THOUGHTREQUIRED A PARTICULAR ANSWER WHICH I SENDENCLOS BY ITSELF. THE PERSON DESCRIBD ISPROBABLY THE PERSON ENQUIRD AFTER AND IF HEBE IT DOS NOT SEEM TO ME THAT YOU CAN MAKEANY USE OF HIM. THE PROIECT HE PROPOSD TO MECHIMERICAL and MADE ME SUSPECT THAT
Page 2: HE WAS a MAN OF LITTLE CAPACITY OR ONE SENTBY THE COURT FROM HENCE TO TRY TO INSINUATEHIMSELF INTO YOUR GOOD OPINION IN ORDER TOBETRAY ANY CIUNSELLS OR DESIGNS OF YOURS THATMIGHT COME TO HIS KNOWLEDGE YOU HAUE. NOBATHE BEST INFORMATION JCOUD GET ABOUT HIM and whatever HE MAY BE I DONT QUESTION BUT YOUWILL THINK IT PROPER TO BE upon YOUR GUARDAGAINST HIA OR ANY OTHER PERSON THAT SHALLCOST YOU IN SUCH A MANNER. Mons Ray & Rook HAS NOW MET …
The Role of Madame de Prie in the 1724 Encrypted Letter
One of the most interesting parts of the decrypted 1724 letter is the mention of Madame de Prie, a prominent figure in French political circles during the early 18th century. Madame de Prie, the mistress of the Duke of Bourbon (“Monsieur Le Duc”), wielded significant influence at the French court, since she was basically in full control of the duke. The letter hints at her potential involvement in a secretive political scheme, suggesting that her support should be secured — through financial incentives. Interestingly, she was the only person not mentioned using a code name, which we identified so far.
Conclusion
Deciphering this 1724 letter was a really fascinating project, giving me insights into the methods of communication and encryption used in the early 18th century in England. But also, it kept me wondering why such important political communication was not secured with a more secure cipher than just a simple monoalphabetic substitution. Finally, the unresolved nomenclature elements left open the possibility of further research to identify the mentioned persons and places. This is now up to the historians :-).
References
Kopal, Nils und Makin, Katy. „Decipherment of an Encrypted Letter from 1724 Found in UCL Special Collections’ Brougham Archive”. In Proceedings of the 7th International Conference on Historical Cryptology (HistoCrypt 2024), Oxford/Bletchley Park, UK, 2024: URL: https://doi.org/10.58009/aere-perennius0104
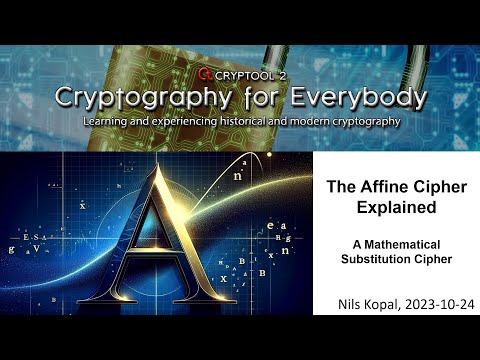
A few weeks ago, I was asked by a viewer of my YouTube channel (“Cryptography for everybody”) if there was an “affine cipher component” in CrypTool 2. After taking a look at all our components, I realized that there was no component that implemented this cipher. I made a video for new CrypTool 2 developers and how they may implement the affine cipher, as an example of how to build new CrypTool 2 components. But I never added such an affine cipher component to CrypTool 2. So I sat down and created a brand new component and also made a YouTube video about the cipher (see the video at the end of this blog article). Also, in this blog article I summarize the video and how the encryption process works. You’ll also learn about the size of the key space and the unicity distance of the affine cipher. I hope you enjoy reading the article and that you understand how the cipher works afterwards.
1. Introduction to the Affine Cipher
The affine cipher is essentially a monoalphabetic substitution cipher, which means each letter of the plaintext is substituted with another letter to form the ciphertext. This method can trace its origins back to the time of the Caesar cipher, a cipher used in ancient Rome.
Over the course of history, as the mathematical domain grew, so did the complexity and strength of ciphers. The affine cipher is a one of the first testaments to this growth, combining the principles of two basic ciphers: the additive and the multiplicative cipher.
An interesting aspect of the affine cipher, and the ciphers we’ll be discussing, is that they operate on numbers. The ciphers essentially translate each letter of the used alphabet (e.g. the Latin alphabet) into a number (and back), providing a platform for mathematical operations. This translation is quite straightforward:
2. The Additive Cipher
Let’s start with the basics. The additive cipher functions by adding an offset number to each letter, shifting it to the right. This is the underlying principle behind the famous Caesar cipher.
The multiplicative cipher involves multiplying each letter with a specific number. This process essentially “randomly selects” a letter from the alphabet, but still for each plaintext letter always the same ciphertext letter.
Key elements:
Key: The multiplication value, denoted as 𝒂. However, there needs to be an inverse (𝑎⁻¹) of this value for decryption. For a number 𝒂 to have a multiplicative inverse modulo m (here the alphabet size, which is 26), 𝒂 and m must be coprime, which means their greatest common divisor (GCD) is 1. In mathematical terms: gcd(a,m)=1.
Encryption: 𝑐 = (𝑝 ∙ 𝑎) 𝑚𝑜𝑑 26
Decryption: 𝑝 = (𝑐 ∙ 𝑎⁻¹) 𝑚𝑜𝑑 26
To illustrate, let’s use 𝑎 = 5 (with its inverse 𝑎⁻¹ = 21):
Note: Computing the inverse of a number in modular arithmetic is crucial. Techniques like the extended Euclidean algorithm (see https://en.wikipedia.org/wiki/Extended_Euclidean_algorithm) come in handy, and we’ll delve into this in a future discussion (and youtube video :-))!
4. The Affine Cipher
Building on the previous concepts, the affine cipher is a combination of both additive and multiplicative ciphers.
Key components:
Key: Comprises a multiplication value 𝒂 and a shift value 𝒃.
Encryption: 𝑐 = (𝑝 ∙ 𝑎 + 𝑏) 𝑚𝑜𝑑 26
Decryption: 𝑝 = (𝑐 − 𝑏) ∙ 𝑎⁻¹ 𝑚𝑜𝑑 26
For a hands-on example, using 𝑎 = 5 (inverse 𝑎⁻¹ = 21) and 𝑏 = 5:
Understanding key spaces and unicity distances is essential for appreciating the security of a cipher:
Keyspace size: For the affine cipher, we have 25 possible values for 𝒂 and 26 for 𝒃. However, 𝒂 and 26 need to be coprime. Thus, only specific values are valid for 𝑎 as they possess an inverse (𝑎⁻¹). These values are 1, 3, 5, 7, 9, 11, 15, 17, 19, 21, 23, and 25. The total key space is then 12 x 26 = 312.
Unicity distance (𝑈): This concept helps determine the number of characters required to uniquely identify plaintext from its ciphertext. For the affine cipher, using the entropy of the key space (𝐻(𝐾)) and the redundancy of the English language (𝐷), the unicity distance is approximately 3. The equation to compute the unicity distance is U = H(K)/D.
In essence, the affine cipher, with its mathematical underpinnings and historical significance, offers an exciting glimpse into the world of cryptography. Whether you’re a beginner or an aficionado, diving into these ciphers can be both intriguing and rewarding. Stay tuned for more cryptographic adventures also with CrypTool 2
6. A YouTube Video About the Affine Cipher
Of course, I also made a YouTube video about the affine cipher. You may watch it here:
The Affine Cipher – A Mathematical Substitution Cipher
In the world of cryptography, security and simplicity are often at odds. But what if there was a way to bridge the gap between understanding cryptography and actually doing robust encryption? A few months ago, I found out that there is a simplified version of AES, called Simplified AES (S-AES). It is a very intriguing cipher intended as a teaching tool, analogous to Simplified DES (S-DES) for DES (which I had already implemented in CrypTool 2 many years ago). I implemented S-AES as a new CrypTool 2 component and also created a YouTube video about the cipher (see end of blog article). Also, my blog article here explains the main components of S-AES, breaks down the two rounds, and demonstrates the basic operations. I also suggest that if you really want to know how the cipher works, in addition to reading the article and watching my YouTube video, you implement the cipher yourself. As for me, I don’t understand a cipher 100% until I implement it myself :-).
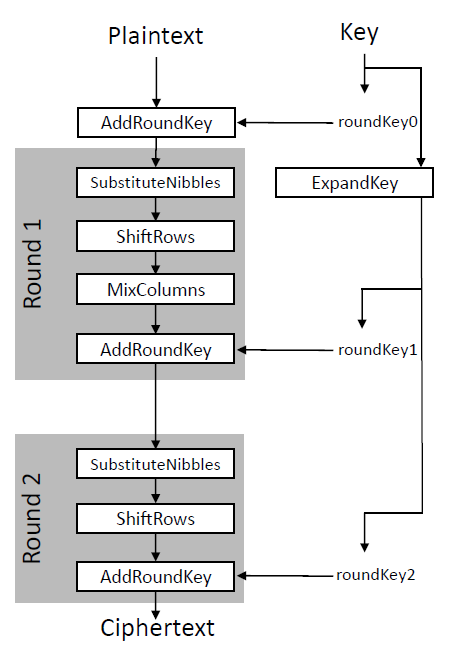
We’ll start with an overview of the cipher. The following figure therefore shows the complete algorithm:
Simplified AES Algorithm taken & modified from [1]
S-AES is a block cipher and it has a keysize of 16 bit and a blocksize of 16 bit. It consists of two rounds and a key expansion, which generates two additional round keys based on the provided 16-bit key. The first round consists of four building blocks, while the last round only uses three of these. In the following, we first shortly discuss the history of the S-AES cipher and after that each of the building blocks. Finally, we have a look at the key scheduling.
1. The S-AES Cipher
Simplified AES, or S-AES, made its debut in 2003 thanks to the work of Musa et al. [2]. Just like its more complex counterpart, the Advanced Encryption Standard (AES), S-AES is a block cipher. However, it is designed primarily for educational purposes, making it a learning tool for the classroom. While AES operates on 128-bit blocks and employs 128, 192, or 256-bit keys, S-AES works with 16-bit blocks and 16-bit keys. Furthermore, S-AES comprises only two rounds, as opposed to AES, which has 10, 12, or 14 rounds depending on the key length [1]. This design allows cryptography enthusiasts to grasp the core concepts without the overwhelming complexity of AES.
[1] Holden Joshua, Rose Hulman Institute of Technology ” A Simplified AES Algorithm “. 2010 (Figures by Holden) [2] Musa, Mohammad A., Edward F. Schaefer, and Stephen Wedig. “A Simplified AES Algorithm and its Linear and Differential Cryptanalyses“. Cryptologia 27.2 (2003): 148 177.
2. AddRoundKey Operation
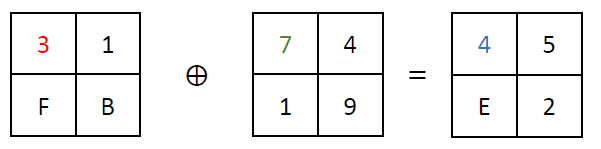
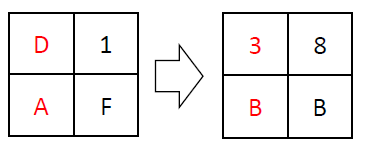
The first step in an S-AES round is AddRoundKey. This operation involves XORing a 16-bit round key onto the 16-bit state. The state is shown here always as 4×4-table, each cell contains a nibble and the first column is the first byte and the second column is the second byte. XORing is a bitwise operation that combines the bits of two inputs, returning a new value based on their differences. Consider the following example:
In this case, each corresponding bit of the state and the round key is XORed together, producing the result 4E 52. Example XORing of a single state nibble:
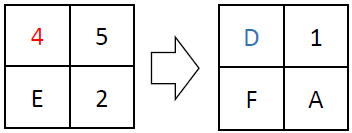
3. SubstituteNibbles Operation
Next up is SubstituteNibbles, which applies a 4-bit S-box to the 16-bit state. The S-box is a lookup table that replaces each 4-bit input with a corresponding 4-bit output. For instance:
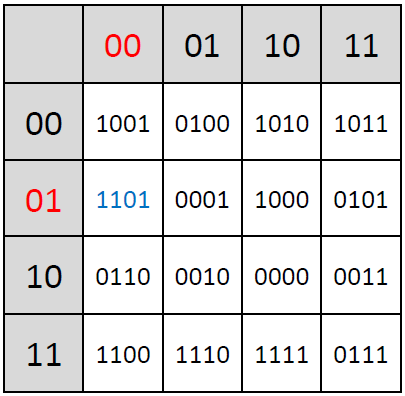
The S-AES 4-bit S-box is a key element of this operation, performing a specific substitution for each possible 4-bit input value. An example S-box lookup for a specific value looks like:
The corresponding S-box table is defined as follows:
4. ShiftRows Operation
ShiftRows involves exchanging the last two nibbles of the 16-bit state. It’s important to note that this operation is self-inverse, meaning it can be reversed to decrypt the data. For example:
An example computation of ShiftRows looks like:
This is the only primitive, which is self inverse. All other primitives have an inverse which is used for decryption instead of the encryption primitive.
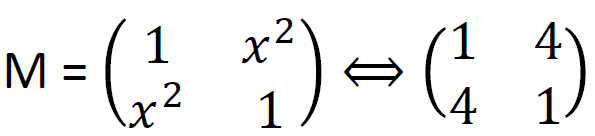
5. MixColumns Operation
MixColumns applies a matrix operation on the 16-bit state within the Galois field GF(16). This operation can be quite complex, but it’s essential for ensuring strong encryption. For example:
It uses the reducible polynomial 𝑥^4+𝑥+1 for GF(16).
The matrix to mix the columns is is:
An example computation of both state bytes looks like:
The matrix multiplication is performed within GF(16). Best is to use a precomputed lookup table for the multiplication. To see how computing in finite fields works, have a look at https://en.wikipedia.org/wiki/Finite_field.
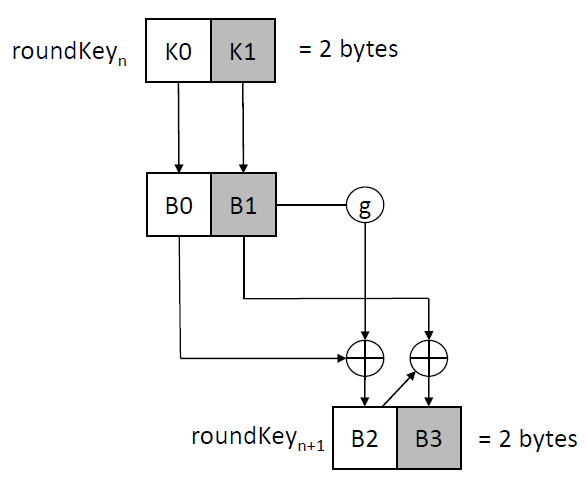
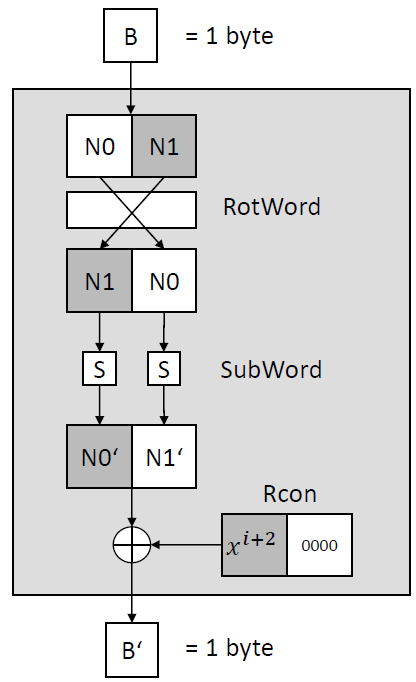
6. KeyExpansion
Inspired by the AES key expansion algorithm, S-AES’s ExpandKey operation computes round keys for each round. It employs a round constant array (Rcon) to generate the necessary keys. For instance, roundKey1 and roundKey2 can be computed using this scheme:
And the g function is defined as follows:
7. YouTube Video
If you want some more explanations and details, please have a look at my YouTube video about S-AES, where I explain each step in more detail:
The Simplified Advanced Encryption Standard (S-AES) Explained
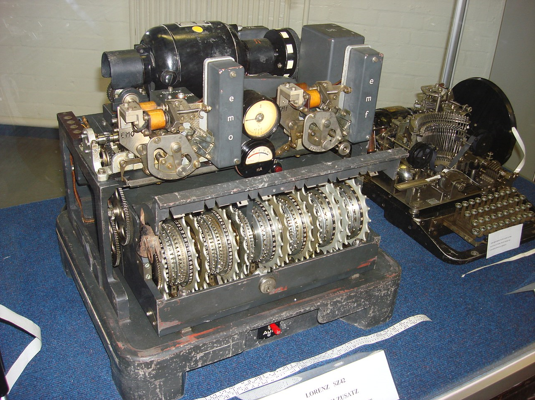
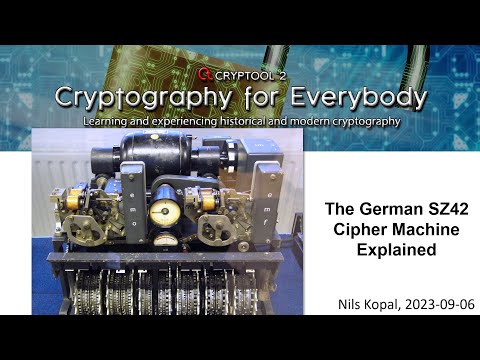
The annals of World War II are replete with tales of ingenious inventions, some designed to bring destruction, and others to guard secrets. Among the latter is the SZ42, or “Schlüsselzusatz 42,” a German rotor encryption machine. I was always fascinated of this machine, which is one of the first “stream ciphers” you could say. Since we had no implementation in CrypTool 2, I created an implementation based on the very good descriptions of the cipher written by my friend George Lasry. Also, I made a YouTube video about the machine which you can find at the end of this article.
Of course, I also wanted to write a blog article (this one here :-)), which shows all the components of the machine in detail. Therefore, in this article we’ll unravel the mysteries of the SZ42, exploring its history, inner workings, and the encryption it offered during wartime.
Lorenz SZ42 (“Schlüsselzusatz 42”) Image from Wikipedia taken in Bletchley Park Museum
Introduction to the SZ42
The SZ42, short for “Schlüsselzusatz 42,” translates to “cipher attachment 42” in English. It was one of Germany’s cryptographic machines deployed during World War II. Notably, there were several models of this machine, including the SZ40 and SZ42, along with variants like SZ42a, SZ42b, and SZ42c. The Germans called it “Sägefisch” (“sawfish” in English), while at Bletchley Park, it went by the codename “Tunny,” akin to a tunafish.
Developed by the German company “C. Lorenz AG,” the SZ42 served the role of encrypting radio teletype (RTTY) communications. It began with an experimental link using SZ40 machines in June 1941, but it was the enhanced SZ42 machines that came into substantial use from mid-1942 onwards, primarily for high-level communications.
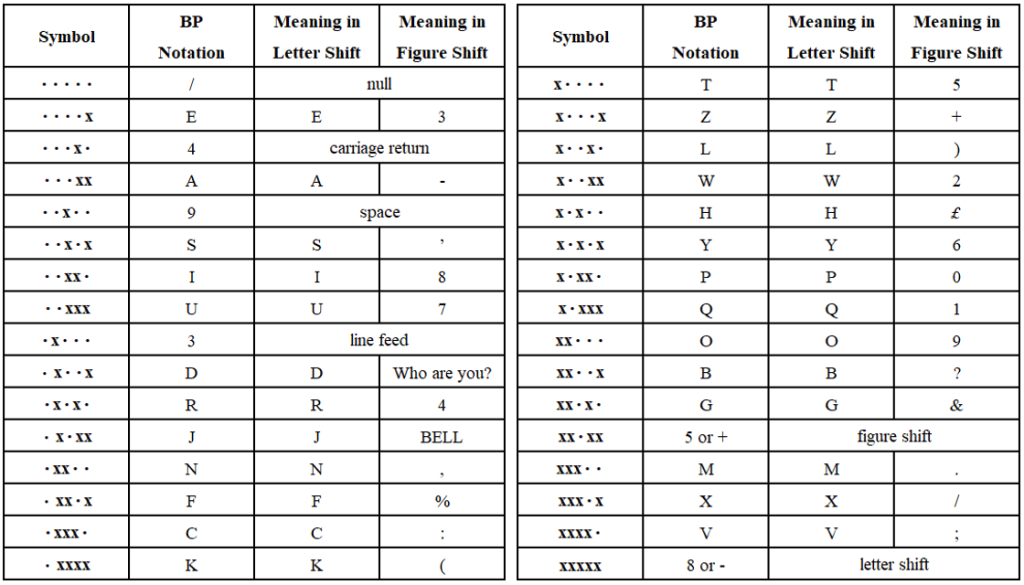
2. Baudot Code
To understand the SZ42’s significance, we must first delve into the Baudot code, the lingua franca of early teleprinter communications. Émile Baudot invented this pioneering bit-based code in the 1870s. It preceded the International Telegraph Alphabet No. 2 (CCITT-2), the most common teleprinter code before the advent of ASCII.
Baudot code words are composed of 5 bits, allowing for a total of 32 possible code words. However, this proved insufficient for encoding letters, digits, and special characters. To circumvent this limitation, Baudot introduced special symbols known as “figure shift” and “letter shift” to alter the code word representation. The version of Baudot code used in the SZ42 was the “Baudot-Murray-Code,” which optimized code assignments for commonly used letters, reducing strain on the teletypewriter mechanics.
Baudot Code Table – Regular and Bletchley Park (BP) Notation
3. How Does the SZ42 Encryption/Decryption Work?
The SZ42 operated by encrypting and decrypting Baudot code transmitted and received by teletype printers. It accomplished this by generating a “pseudo-random” stream called K, consisting of 5-bit code words, which was then XOR-ed with the plaintext (P) or ciphertext (C).
Encryption: C = P ⨁ K
Decryption: P = C ⨁ K
This method marks the SZ42 as one of the early stream ciphers, a critical precursor to modern encryption techniques.
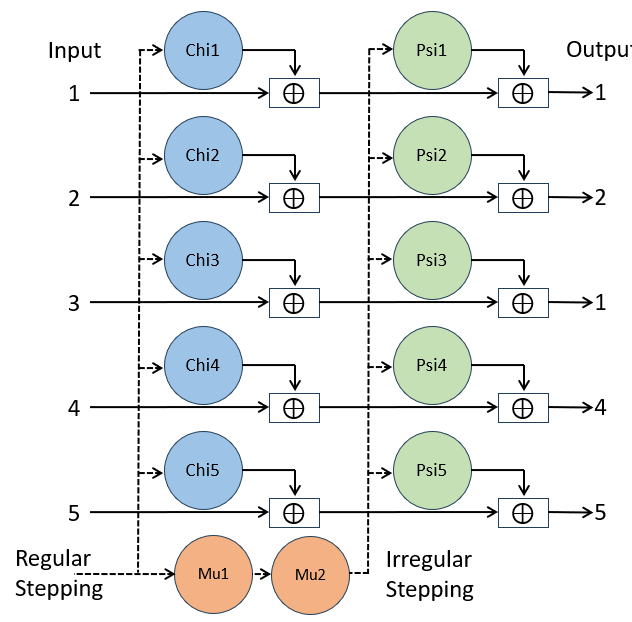
4. The Inner Mechanism of the SZ42
The SZ42 boasted an intricate design with a total of 12 wheels, categorized into Chi, Psi, and Mu wheels. Each wheel had a unique pin count, with the Chi wheels having 41, 31, 29, 26, and 23 pins, Psi wheels with 43, 47, 51, 53, and 59 pins, and the Mu wheels with 61 and 37 pins.
SZ42 Logical Diagram
Whenever a pin was in an active position, it added a 1 to the keystream, while in inactive position it added a 0. For each of the 5 Baudot bits, there were one Chi, and one Psi wheel. The Chi wheels stepped regularly after each encryption, whereas Psi wheels stepped irregularly if Mu2 had an active pin, with Mu1 also stepping regularly after each encryption. Mu2 only stepped when Mu1 had an active pin.
5. Key Generation and Motor Limitations
Key generation in the SZ42 was governed by specific rules for setting the allowed numbers of active pins on each wheel. For example, Chi wheel 1 had a rule like “Allowed number of crosses in Chi1 is 20 or 21.” These rules ensured the machine operated effectively.
Motor limitations, like “CHI2_1BACK,” were introduced to make cryptanalysis more challenging. They compelled Psi wheels to move at specific positions, increasing the complexity of decryption. These limitations aimed to reduce the number of motor stops for Psi wheels, enhancing the machine’s security.
For details have a look at: James Reeds, Whitfield Diffie, and J.V. Field. 2015. Breaking Teleprinter Ciphers at Bletchley Park: An Edition of I.J. Good, D. Michie and G. Timms: General Report on Tunny with Emphasis on Statistical methods (1945). John Wiley & Sons.
6. Keyspace Size and Unicity Distance
The SZ42’s keyspace size without any wheel setting rules was staggering:
Sub-keyspace Computations
Considering these immense sub-keyspaces for each wheel-set, the total keyspace size reached:
Total Keyspace Computation
This immense keyspace made brute-force attacks infeasible.
Furthermore, the SZ42 had a unicity distance U of 157, making it an incredibly secure encryption tool. Unicity distance can be camputed by dividing the Entropy of the keyspace by the redundancy of the (English) language:
Unicty Distance Computation
Unicity distance is a concept in cryptography that refers to the minimum amount of ciphertext (encrypted text) required for an attacker to uniquely determine the corresponding plaintext (original message) while performing a brute-force attack. Since there are no “half” letters, the unicity distance value is always rounded up. With the (non-key rules-restricted) SZ42 a minimum number of 157 letters is required to obtain only one single valid solution when performing an attack. With less letters, we obtain multiple plaintexts and we can not distinguish which one is the correct one.
7. Conclusion
The SZ42 cipher machine stands as a testament to the ingenuity of its time, showcasing advanced encryption techniques during World War II. Its large keyspace and wheel-based encryption made it a challenging adversary for codebreakers. This machine’s historical significance and cryptographic complexity serve as a testament to the ever-evolving world of encryption and information security. Nevertheless, using Colossus, one of the first “computers”, the code breakers of Bletchley Park were able to frequently break into the encryption offered by the SZ42. Today, using modern techniques like hillclimbing and simulated annealing, we are also able to break the cipher
8. A YouTube Video About the SZ42
I also made a YouTube video about the SZ42 which you can watch here:
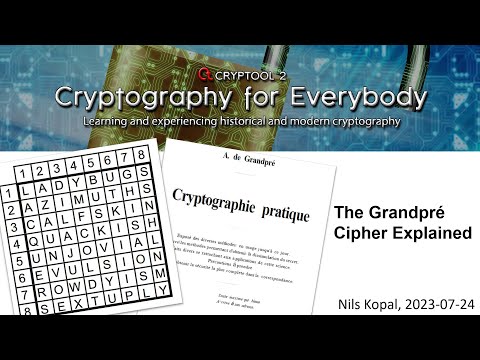
Some days ago, I saw a very interesting hand cipher called the “Grandpré cipher”. It is not interesting because it was very secure or original. It is interesting because the “keying process”, i.e. the search for words for usage as the key(s), was kind of tedious. In this blog article, I will explain the background of the cipher, how it works, and its keyspace size and unicity distance.
History of the Grandpré Cipher
The cipher is said to be first published by A. de Grandpré in his 1905 French book “Cryptographie pratique”. It was later named after the author. Unfortunately, I did not find any information on the author despite his (or her?) last name. So, I actually don’t know what the “A.” stands for. The description of the cipher itself can be found in the book on page 31. The chapter is named “Méthode de carre de 10×10”, which can be translated to “10×10 square method”. Grandpré defined the method for squares of 10×10, but squares with smaller sizes (9, 8, 7, 6) can also be used. We did also implement the cipher in a CrypTool 2 component. So if you want to try it by yourself, you may download CrypTool 2 to do so. Here, we show the original cover of Grandpré’s book:
The Grandpr´é cipher is a homophonic substitution cipher based on a keyword and several additional words. The cipher encrypts plaintext letters into two-digit ciphertext numbers. It uses a table to do so. We will discuss how this works in the next section.
Table Creation Based on Keyword and Words
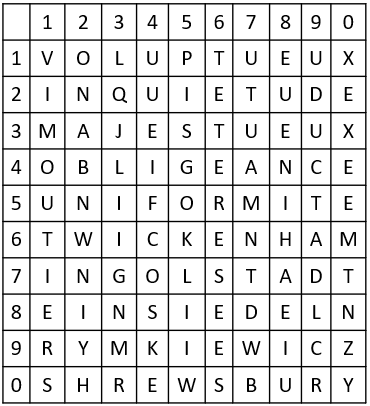
First, we need to find 10 words (or less), depending on our selected table size. The table size depends on our chosen secret keyword. Let’s say our secret keyword is “VIMOUTIERS” as used by Grandpré in his book. This keyword has 10 letters, so our table has to be a 10×10-sized table.
Now, we have to find 10 more words, each starting with a letter of our secret keyword. So a word for “V”, let’s take “VOLUPTUEUX”, a word for “I”, let’s take “INQUIETUDE”, and so on. Of course, here, for the example, we used the same words which Grandpré used in his book. To create the table, we write the keyword in the first column and the additional words in the rows. Each word starts with one of the letters of the keyword. The final table looks like the one below. But besides adding only the words, we also add digit coordinates (from 1 to “keyword length”; 10 = 0) to the rows and columns:
10×10-table based on the keyword “VIMOUTIERS” as shown by Grandpré in his book
Encryption and Decryption
Now, we can use this table to encrypt a text. To encrypt a letter, we need to find it in the table. Then, we use the row R and column C to create our ciphertext symbol “RC”. Examples: E = “34”, A = “47”, E = “66”. Here, you can also see why the cipher is a homophonic substitution cipher. We have several options to choose from for most of the letters. But you can also see the drawback of the cipher. It is troublesome to find words for the table creation that contain all letters of our alphabet. Especially rarely used letters like Q and X are difficult to add to the table.
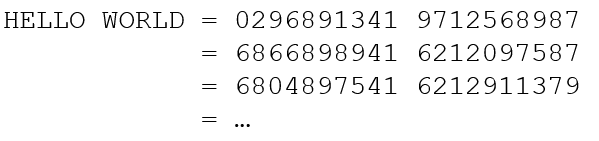
As an example, here is the encryption of the plaintext “HELLO WORLD”:
As you can see, we have several valid ciphertexts. Since the Grandpré cipher is a homophonic substitution cipher, we can use different homophones to create a variety of valid ciphertexts.
Clearly, the decryption of a given ciphertext is the inverse process. Here, you always take two digits and lookup the corresponding plaintext letter in the same table as used for encryption.
Keyspace Size and Unicity Distance
Here, we calculate the size of the keyspace and the unicity distance of the Grandpré cipher. We compute the largest possible keyspace obtained by using a 10×10 table.
For the 10 x 10 case, there are 10 ∙ 10 = 100 cells in the table. Thus, we have a total number of 26^100 = 2^470 tables. But we use English words and don’t use the complete “table space”. Thus, let’s consider English has about 2,000 10-letter words. Then, we would “only” have 2000^10 valide tables, which is about 2^110 different tables.
Now, based on the above computed keyspace, lets compute the unicitiy distance U. It is the minimum number of letters needed when cryptanalyzing a ciphertext which allows us to be able to obtain only one valid solution. Below this number, we can find multiple valid English texts. To compute the distance, we have to divide the entropy of the keyspace H(K) by the redundancy D of the English language:
We need a minimum of 35 letters to be able to obtain only a single valid solution through cryptanalysis. Clearly, a given ciphertext can be solved like any other digit-based homophonic substitution cipher :-).
A YouTube Video About the Cipher
I also made a YouTube video about the Grandpré cipher. You can watch it here 🙂
The Typex is a cipher machine used by the British during World War II. It is, similar to the German Enigma cipher machine, an elector-mechanical rotor encryption machine. In contrast to the Enigma, the Typex was not broken during WWII. The Germans believed that Enigma is unbreakable and since Typex is very similar, they did not even attempt to break the machine.
I recently wrote a new CrypTool 2 component that implements the Typex cipher machine. If you are interested in testing the component (and the machine) yourself, you should download the latest nightly build of CrypTool 2.
History and Usage of the Typex
The Typex machine was used for a) Encryption of the own communication b) Deciphering German Enigma messages
It was developed by Wing Commander Oswyn G.W. Lywood, Flight Lieutenant Coulson, Mr. E. W. Smith, and Sergeant Albert Lemon.
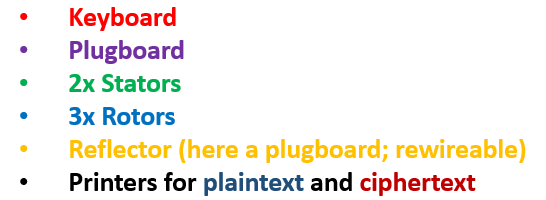
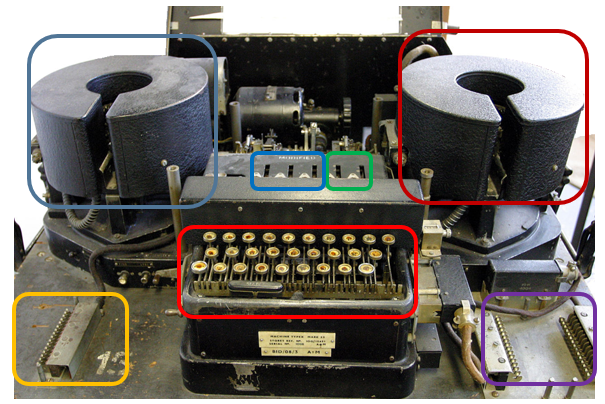
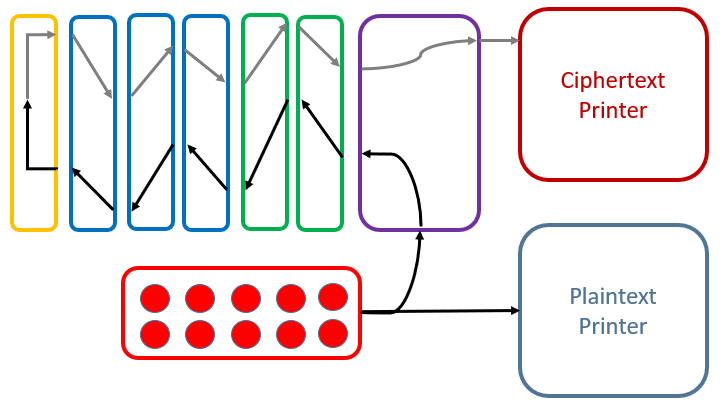
In the following, we have a look at the machine’s components. The Typex machine consists of:
Components of Typex
Typex machine with marked components
Logical overview of Typex components
When pressing a key on the keyboard, the plaintext letter is printed by the plaintext printer. Also, current flows through the plugboard, the two stators, the three rotors and is then reflected by the reflector. Then it flows back through the three rotors and the two stators as well as the plugboard. Finally, the ciphertext letter is printed by the ciphertext printer.
Clearly, every time a key is pressed, between one and all three rotors move (Stators of course don’t move). In contrast to Enigma, a Typex rotor moves much more often. This is because the rotors have between 4 and 7 notches, while Enigma rotors had at most two notches.
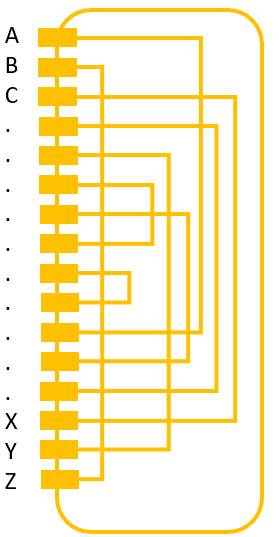
The Typex Plugboard
The Typex plugboard is the first (and last) component (despite the printers), which current is lead through after a key is pressed on the keyboard. It allows to “plug” letters, creating an initial monoalphabetic substitution.
Typex plugboard
The plugboard is not reciprocal (like the Enigma‘s plugboard. With Enigma, if we have letter X to letter Y, then we would also have letter Y to letter X). It, thus, offers a larger keyspace than Enigma’s plugboard.
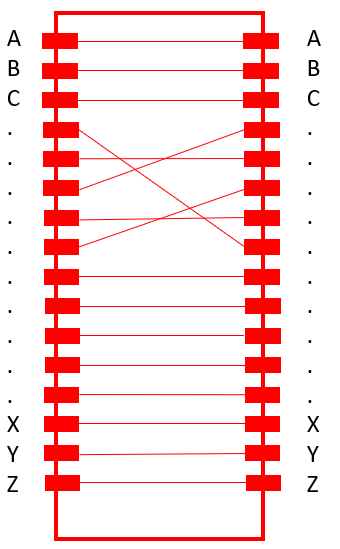
The Typex Rotors/Stators
Typex consists of two stators and three rotors. A rotor has more „notches“ than Enigma rotors (in CrypTool 2’s Typex implementation between 4 and 7). A rotor’s electrical contacts are doubled to improve reliability. Unfortunately, the original rotors are not published and still kept secret, thus, the simulators use no official rotor definitions.
Typex rotor
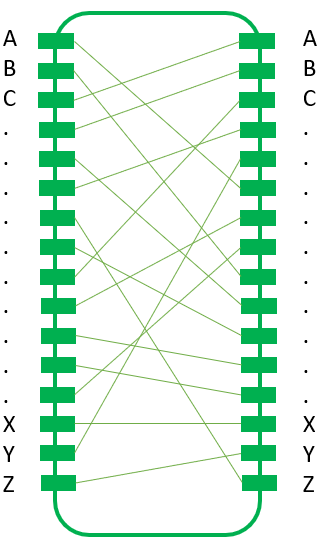
The Typex Reflector
The Typex reflector “reflects” the current coming from the rotors back through the rotors. In later Typex versions the reflector was replaced by an additional plugboard which allowed to change the reflector’s wiring easily.
Typex reflector
Keyspace Size and Unicity Distance
Since no original rotor definitions are known, the computation of keyspace size and unicity distance is based on the “CyberChef” Typex simulator written and published by GCHQ (see https://gchq.github.io/CyberChef/).
With this implementation, we have to choose 5 rotors (3 actual rotors and 2 stators) from a set of 8 rotors. Since a rotor can be put into the machine in forward or reversed position, they basically doubled the amount of usable rotors to 16. Here, we assume that we can use each rotor as many times as we like in parallel. Thus, the “rotor keyspace size” is:
Typex rotor keyspace size (“CyberChef” version)
We have to set the rotor start positions. We have five rotors (3 actual rotors and 2 stators). Each rotor can be in one of 26 different positions (A-Z). Thus, we have a total “start position keyspace” of:
Typex start position keyspace size
The plugboard is basically a simple monoalphabetic substitution cipher. That means, for the first letter we have 26 different letters to choose from, for the second letter, we have 25 different remaining letters to choose from,… Thus, the “plugboard keyspace” is:
Typex plugboard keyspace size
To compute the overall keyspace size, we have to multiply all “sub-keyspace” sizes:
Total keyspace size of the Typex (“CyberChef” version)
To compute the unicity distance U, we have to divide the entropy of the keyspace by the redundancy of the (English) language:
Typex unicity distance U (“CyberChef” version)
This means, we need a minimum of 42 letters to be able to obtain a single valid solution when we perform cryptanalysis of a Typex message.
A YouTube Video about Typex and a Web-Based Simulator
I also created a YouTube video about the Typex cipher machine. Here, I discuss the machine as well as its keyspace size and unicity distance. Also, I show how to use the Typex component in CrypTool 2:
The British Typex Cipher Machine Explained
Finally, if you want to “play” with a really nice simulator (and also want to learn much more about the Typex), you should have a look at the “Virtual Typex”: https://typex.virtualcolossus.co.uk/Typex/
The usage of the simulator is also shown in the above linked YouTube video :-).
The GRANIT / 160 cipher is a hand cipher which was used for communication between the GDR’s “Ministerium für Staatssicherheit” (Engl. Ministry for State Security) or MfS or Stasi and their agents in West Germany. The Stasi’s “Geheime Dienstvorschrift” (Engl. secret service regulation) GVS 1064/59 and GVS 1065/59 describe its usage. Copies of the original (German) service regulations can be found on Jörg Drobicks’s homepage.
The logo of the “Ministerium für Staatssicherheit”(Engl. Ministry for State Security) or MfS aka Stasi – Source Wikipedia
The GRANIT cipher is a variant of the “Doppelwürfel” (= double columnar transposition cipher). The Stasi communicated with their agents in West Germany via numbers stations: The agent had to turn on a radio and wait for his call sign. Then, the agent notes down the spoken numbers and after that he decrypts the received message using the GRANIT cipher.
The West German “Zentralstelle für das Chiffrierwesen” (Engl. Central Office for Ciphering) was able to capture and decipher messages, because they could guess some of the used keys.
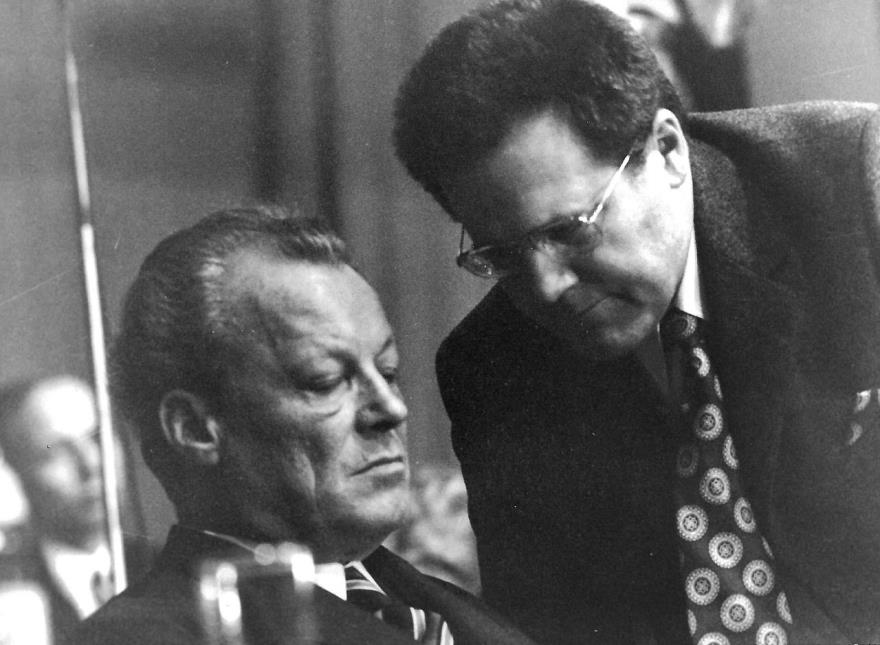
The Günter Guillaume Case – An East German Spy Near Willy Brandt
Günter Guillaume and his wife Christel Guillaime were East German spies deployed in West Germany. Günter Guillaume became officer in the economic, financial and social policy department of German Chancellor Willy Brandt. The Guillaume couple used the GRANIT cipher for communication with the Stasi. But the West German “Zentralstelle für das Chiffrierwesen” was able to decipher some of their messages.
Willy Brandt and Günter Guillaume (right) in Düsseldorf. Image ~ 1973 – Source Wikipedia
Matching birthday date wishes and well wishes for the birth of a son were found in a deciphered message. The Guillaumes were finally caught and arrested in 1974. Ironically, mentioned birthday dates of the Guillaumes were their “agent fake birth dates”…
Despite having good evidence police raided his home but Guillaume instantly confessed being a Stasi spy when approached by police. More about the story can be read (in German) on Klaus Schmeh’s blog.
How the GRANIT / 160 Cipher Works
The GRANIT / 160 cipher is a hand cipher and consists of five steps:
Create a straddling checkerboard based on a keyword
Encrypt the plaintext using the straddling checkerboard
Create two rectangles for a double columnar transposition based on two key phrases
Encrypt the numbers (result of step 2) using the first rectangle
Encrypt the numbers (result of step 4) using the second rectangle
Clearly, the Stasi defined how to create the keys, how to create message indicators so that the receiver of a message is able to decrypt, etc. The details of these procedures and the details of the actual cipher can be seen in the video below :-).
A YouTube Video about the Details of the Cipher
If you want to know, how the details of the GRANIT cipher work, please watch my YouTube video on “Cryptography for everybody” about the GRANIT cipher:
The GRANIT / 160 Cipher Explained – a GDR Spy Cipher
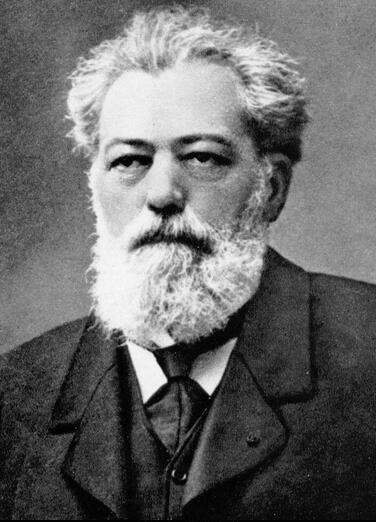
The Bazeries cipher was invented by and named after Étienne Bazeries, a French cryptographer. Bazeries was active between 1890 and the First World War.
Étienne Bazeries (Source: Wikipedia) (21st August 1846 – 7th November 1931)
Bazeries is probably most famously known for the “Bazeries Cylinder”, a cipher device similiar to the Jefferson Disk or the M-94 cipher. Bazeries was a good code breaker: He solved messages encrypted with the official French military transposition system (lead to improvements of the ciphers). He further exposed weaknesses in French cipher systems. He assisted in solving German military ciphers during World War I, after he retired from the army. And in the 1890s he broke the famous nomenclator system called the “Great Cipher”, created by the Rossignols in the 17th century.
How Does the Cipher Work?
The cipher is a combination of substitution and transposition. For encryption, Bazeries only used a single number key, e.g. 123. In the following, we encrypt an example plaintext (“HELLOWORLD”).
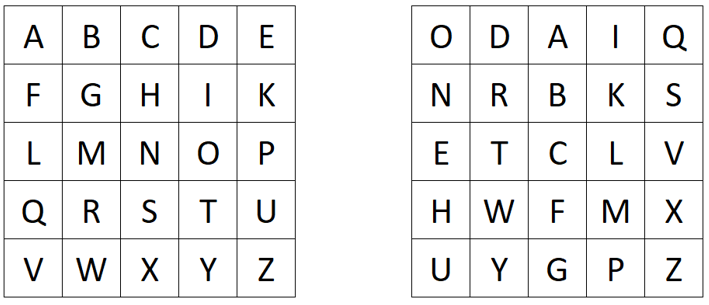
We create two Polybius squares. In the first square, we put the Latin alphabet (I=J; filled from left to right and top to bottom row-wise). In the other square, we write a text representation of the number key, e.g. ONEHUNDREDTWENTYTHREE, followed by the remaining unused letters of the Latin alphabet. We fill the second square from top to bottom and left to right column-wise:
Two Polybius squares for a Bazeries cipher
To encrypt a plaintext, we first substitute it using the two created Polybius squares. We look for the plaintext letter in the left square and use the corresponding letter of the right square for the ciphertext (For eample A->O, B->D, etc.). When we encrypt HELLOWORLD, we obtain BQEELYLWEI.
Then, we transpose the intermediate ciphertext using the digits of the number key. We split the text into blocks of sizes defined by the digits of the number key. Then, we reverse each of these blocks to create the final ciphertext:
Bazeries cipher transposition
So our final ciphertext here is BEQYLELWEI. Of course, the decryption is the inverse process of the above shown steps :-).
Keyspace Size and Unicity Distance
Here, we compute the keyspace size as well as the unicity distance (https://en.wikipedia.org/wiki/Unicity_distance). In the original version, as written above, Bazeries created the second Polybius square using the same key as he used for transposition. So for e.g. a maximum number key length of four digits, we compute:
For a 4-digit key, we have 10^4=10,000 different keys
For a 3-digit key, we have 10^3=1,000 different keys
For a 2-digit key, we have 10^2=100 different keys
For a 1-digit key, we have 10^1=10 different keys
Then, we have to add all these number. Thus, we have a toal keyspace size of 11,110
If we consider that the encrypter uses an independent (other) key for the Polybius square creation, we would have to compute 26! ≈ 2^88.4 for the number of possible different Polybius squares. In this case, we have to compute for the “complex” Bazeries cipher 11,110 ∙ 2^88.4 which is about 2^101.8.
To compute the unicity distance (of the complex case), we have to divide the entropy of the keyspace with the redundancy of the language:
Unicity distance of the more complex case of the Bazeries cipher
So we would need a ciphertext with a minimum length of 32 letters to obtain only one valid (and the correct) solution via cryptanalysis.
A YouTube Video about the Bazeries Cipher
I also created a YouTube vide about the Bazeries cipher:
The Bazeries Cipher Explained
We use cookies on our website to give you the most relevant experience by remembering your preferences and repeat visits. By clicking “Accept All”, you consent to the use of ALL the cookies. However, you may visit "Cookie Settings" to provide a controlled consent.
This website uses cookies to improve your experience while you navigate through the website. Out of these, the cookies that are categorized as necessary are stored on your browser as they are essential for the working of basic functionalities of the website. We also use third-party cookies that help us analyze and understand how you use this website. These cookies will be stored in your browser only with your consent. You also have the option to opt-out of these cookies. But opting out of some of these cookies may affect your browsing experience.
Necessary cookies are absolutely essential for the website to function properly. These cookies ensure basic functionalities and security features of the website, anonymously.
Cookie
Duration
Description
cookielawinfo-checkbox-analytics
11 months
This cookie is set by GDPR Cookie Consent plugin. The cookie is used to store the user consent for the cookies in the category "Analytics".
cookielawinfo-checkbox-functional
11 months
The cookie is set by GDPR cookie consent to record the user consent for the cookies in the category "Functional".
cookielawinfo-checkbox-necessary
11 months
This cookie is set by GDPR Cookie Consent plugin. The cookies is used to store the user consent for the cookies in the category "Necessary".
cookielawinfo-checkbox-others
11 months
This cookie is set by GDPR Cookie Consent plugin. The cookie is used to store the user consent for the cookies in the category "Other.
cookielawinfo-checkbox-performance
11 months
This cookie is set by GDPR Cookie Consent plugin. The cookie is used to store the user consent for the cookies in the category "Performance".
viewed_cookie_policy
11 months
The cookie is set by the GDPR Cookie Consent plugin and is used to store whether or not user has consented to the use of cookies. It does not store any personal data.
Functional cookies help to perform certain functionalities like sharing the content of the website on social media platforms, collect feedbacks, and other third-party features.
Performance cookies are used to understand and analyze the key performance indexes of the website which helps in delivering a better user experience for the visitors.
Analytical cookies are used to understand how visitors interact with the website. These cookies help provide information on metrics the number of visitors, bounce rate, traffic source, etc.
Advertisement cookies are used to provide visitors with relevant ads and marketing campaigns. These cookies track visitors across websites and collect information to provide customized ads.